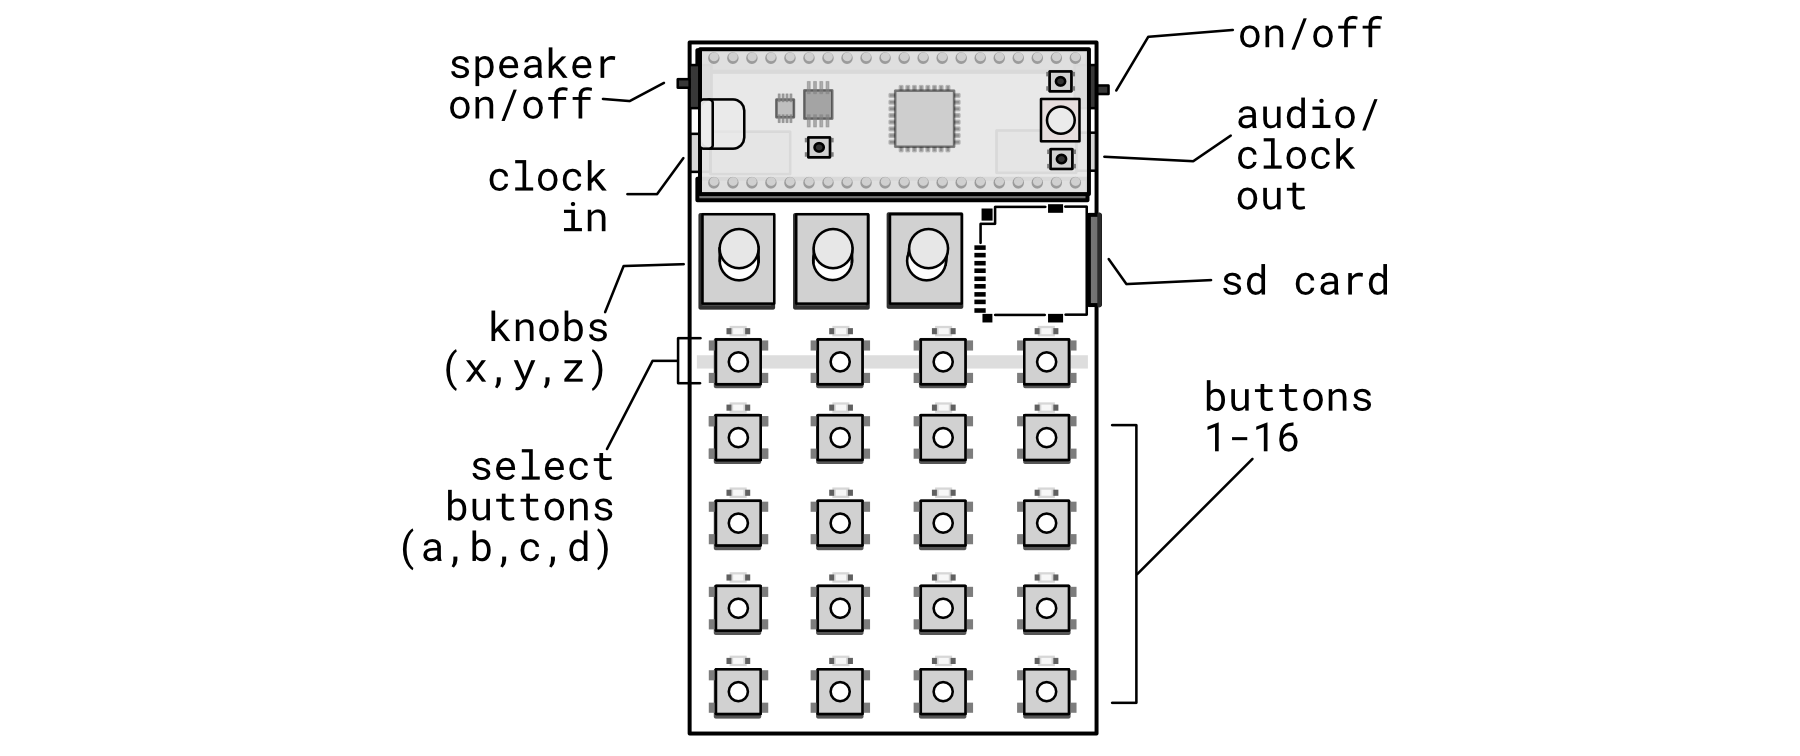
Mode jump Mode mash Mode bass Tempo Pitch Volume Jump Retrigger Loop sequence Change samples Mute Start/Stop Unassigned Filter sweep Bass volume Select sequence Play/stop sequence Record sequence Chain sequence Change banks (with knob) Change samples (with knob) Quantize Select save Load save Create save Octave +1 Random jump Random retrig Random tunnel One-shot Change play mode Resampling Slice playback Sequence lock Tempo match Retrigger pitching Sync out Snares Kicks
Saturation Loss Fuzz Bitcrush Timestretch Delay Comb filter Repeat Tighten Expand Circulate Scratch Lower Pitch Reverse Tapestop
Why is it randomly shutting down? How do I change volume? Sometimes I hear a weird glitch? How do I start and stop? How do I change samples? Which SD card can I use? Is a schematic available? How do I know which version I have?
a handmade, handheld sample player.
sales ship within 3 business days except
"pre-order expedited" ships
within 1-2 weeks
and "pre-order" ships within 3-5 weeks
Stereo playback of 16-bit audio files @ 44.1 kHz sampling rate · SD-card storage for up to 32 gigabytes of samples · Recalls up to 256 audio files (16 banks of 16 tracks) · 16 different effects (saturate, fuzz, delay, reverb, etc…) · Single-cycle wavetable synthesizer · Realtime sequencer with optional quantization · Optional clock sync out · MIDI (in + out) over USB · Built-in 8-ohm speaker · Powered by two AAA batteries or USB-C · Open-source · Handmade in Seattle
To power on the device, toggle the switch on the top right to the “up” position. The device comes pre-loaded with several samples. A sample will start playing automatically.

Navigate through the samples by pressing any of the 1-16 keys.

Experiment with retriggering samples by pressing and holding one 1-16 key and then pressing a different 1-16 key.
The A, B, C, and D keys are used in combination with the knobs to adjust various settings.

Adjust the volume by holding the A key (top left key) and turning Knob Z located on the right-hand side.

Similarly, modify the tempo by holding the A key and turning Knob Y.
There are 16 banks of samples, with each bank capable of holding 16 samples. By default, you are in the first bank and the first sample.

B will select a bank and then sample.To switch to a different bank and select a different sample, follow these steps: first, hold B, then while holding B, press 1-16 to choose a bank. Keep the B key pressed and then press another 1-16 button to select a sample within that bank.
The device powers up in JUMP mode, where pressing 1-16 allows you to navigate through samples. When in jump mode you can hold A and press any of the 1-16 to activate an effect.

There are 16 different effects to choose from.
Each effect can be customized with up to two parameters and features a probability setting. To adjust the effect parameters, enter MASH mode by pressing (A + C). While in MASH mode, press and hold the effect you wish to edit. For instance, hold down 2 to modify the LOSS effect. While holding the effect, use Knob X or Knob Y to tweak the parameters for that effect. Detailed information about each parameter can be found in the effect reference section below. For example, loss allows adjustments to “loss type” and “loss amount.” To modify the likelihood of the effect occurring randomly, use Knob Z.
To add samples, power off the device and remove the microSD card. Samples must be pre-processed before uploading them directly to the SD card. You can utilize the online tool for sample processing or opt to download the tool for offline use. Updating the firmware is simple - download a new release and upload it using a USB-C cable. Follow the provided instructions for uploading firmware to complete the process and install the new firmware.
For any additional information, refer to this guide or utilize the handy reference guide which provides quick access to button combinations and the effect list for easy reference.
The zeptocore is an open-source handheld device for playing with samples, featuring:
if you like this device, you might also like these other small devices made by friends:
zeptoboard is the breadboard variant of the zeptocore. It has most of the same functionality, but instead of using the buttons on the handheld device, you can utilize your keyboard and a midi interface (this website). This version requires some knowledge of breadboarding, but it is ideal if you want to develop your ideas based on the firmware.
you can purchase the components directly from my store or you can buy them from Amazon.
(note: if you purchase components from me, I am able to provide reasonable amounts of support to help with your project).

The zeptocore is a MIDI-compliant device that outputs midi when buttons are pressed or knobs are turned.
The zeptocore will automatically interpret MIDI start/stop/continue messages and automatically sync to the MIDI timing of the incoming signal.
Note: Interpretting other messages like button presses is not yet implemented but planned for a future update.
There are two ways to do MIDI input to the zeptocore.
Simply plug in a USB cable from the zeptocore to a computer. The zeptocore will show up as a MIDI device on the computer. You can then forward MIDI messages from the computer to the zeptocore. For example, you can use midi2midi in a Chrome browser to forward MIDI messages from a MIDI controller to the zeptocore.
I created a device called the itty bitty midi which you can use directly with a MIDI controller to send MIDI messages to the zeptocore. Simply plug in the MIDI controller to the “IN” side of the itty bitty midi and then plug the “OUT” side to the CLOCK input of the zeptocore. The itty bitty midi will automatically forward MIDI messages to the zeptocore.
Note: By default the zeptocore expects clock signals in the CLOCK input. You can switch to MIDI input by pressing the following combination: 13+10+11+16.

The MIDI layer allows you to communicate with the zeptocore via a browser and computer keyboard. Simply open a browser (Note: Chrome only) to zeptocore.com and plug in the zeptocore to the computer.
If successful, a small screen will pop up that lets you see the current state of the zeptocore and allows you to interact with the zeptocore directly via the keyboard:

There are three modes that can be activated within the zeptocore:
Jump Mode is the default mode that is activated when turning on the zeptocore or by pressing A + B. In this mode, the 1-16 keys are used to navigate through audio slices, create loops, or retrigger audio samples for dynamic performance effects.
Mash Mode is accessed by pressing A + C and transforms the 1-16 keys into toggles for activating or deactivating effects. This mode adds complexity and textures to a sample.
Bass Mode can be initiated with A + D and assigns bass notes to the 1-16 keys, allowing users to play melodic basslines directly from the device. This mode enables easy integration of speaker-shaking audio elements into the output.
Periodically, new firmwares are released with updated effects or improved performance. If you have the tool installed, you can connect your device to your computer and automatically update the firmware. You can also download the latest release directly from this link:
To update your zeptocore to the latest version, follow these steps:
BOOTSEL button (located near the USB-C jack).BOOTSEL button, press the NRST button (also near the USB-C jack).RPI-RP2 should appear on your computer.RPI-RP2 drive.

Congratulations, your zeptocore has been successfully updated to the latest version.
(Note: If using zeptoboard, follow the same instructions but ensure you download the latest zeptoboard_v2.4.0.uf2).
If you have installed the tool on your computer, launch the tool and click on the top right to upload a new firmware while the device is connected. Download the tool compatible with your operating system from the latest releases.
Follow these instructions if you want to develop the firmware yourself and create custom images.
Install WSL 2
$ wsl --set-default-version 2
$ wsl --install Ubuntu
Then restart computer and run
$ wsl --install
That should start your system. Then you can follow the Linux directions.
First install homebrew:
/bin/bash -c "$(curl -fsSL https://raw.githubusercontent.com/Homebrew/install/master/install.sh)"
You will need to add Homebrew to your PATH. Do so by running the following two commands:
which brew
will tell you which path your brew is on. then
echo 'eval "$([path to homebrew from command above] shellenv)"' >> /Users/USERNAME/.zprofile (remembering to substitute your username)
eval "$(/opt/homebrew/bin/brew shellenv)"
Now you can install the toolchain:
brew install cmake python
brew tap ArmMbed/homebrew-formulae
brew install gcc-arm-embedded
Now clone the repo and install the Pico SDK
git clone https://github.com/schollz/_core
cd _core
export PICO_SDK_PATH=$(pwd)/pico-sdk
git clone -b master https://github.com/raspberrypi/pico-sdk.git
cd pico-sdk &&  git submodule update --init && cd ..
Now you should be able to build zeptocore:
make clean zeptocore
Install the pre-requisites:
sudo apt install cmake gcc-arm-none-eabi \
    libnewlib-arm-none-eabi \
    libstdc++-arm-none-eabi-newlib \
    git python3 g++
sudo -H python3 -m pip install numpy \
    matplotlib tqdm icecream librosa click
Clone this repo and install the Pico SDK:
git clone https://github.com/schollz/_core
cd _core
git clone https://github.com/raspberrypi/pico-sdk
cd pico-sdk &&  git submodule update --init && cd ..
export PICO_SDK_PATH=$(pwd)/pico-sdk
Do a build:
make clean zeptocore
(replace ‘zeptocore’ with ’ectocore’ or ‘zeptoboard’ if you are building a different image)
Uploading samples is a straightforward process similar to transferring a file onto an SD card. However, as the samples need to be processed to meet the specifications of 44.1 kHz / 16-bit.
The sample tool is required for the sample preprocessing step, before transferring the samples to the SD card. This tool can be accessed online or downloaded to your computer for local use.
Alternatively you can also download the stock samples (751 MB) and load them directly onto the SD card. Stock samples include amen break remixes and incredible contributions from raja (aka ‘itwasalienz’) with a whole bank (bank 2) of amazing drum breaks.

Screenshot of the core tool
To install the tool on macOS, first open a terminal.
Then, if you are on an Intel-based mac install with:
curl -L https://github.com/schollz/_core/releases/download/v2.4.0/core_macos_amd64_v2.4.0 > core_macos
Or, if you are on a M1/M2-based mac install with:
curl -L https://github.com/schollz/_core/releases/download/v2.4.0/core_macos_aarch64_v2.4.0 > core_macos
Then to enable the program do:
chmod +x core_macos
xattrc -c core_macos
Now to run, you can just type
./core_macos
A window should pop up in the browser with the offline version of the tool.
First install Scoop by opening PowerShell terminal and type:
> Set-ExecutionPolicy -ExecutionPolicy RemoteSigned -Scope CurrentUser
> Invoke-RestMethod -Uri https://get.scoop.sh | Invoke-Expression
Then in the Powershell:
> scoop update
> scoop install go zig sox
Now you can build directly from Powershell with:
> cd core
> $env:CGO_ENABLED=1; $env:CC="zig cc"; go build -v -x
Now the upload tool can be run by typing
./core.exe
Make sure Go is installed and then install air:
> go install github.com/cosmtrek/air@latest
Now you can build the tool using the following:
> git clone https://github.com/schollz/_core
> cd _core/core
> go build
For development, you will need to have a SSL certificate installed on localhost, otherwise the MIDI won’t work.
To get a local SSL server that redirects to the core server, follow these instructions. First install mkcert:
sudo apt install libnss3-tools
git clone https://github.com/FiloSottile/mkcert && cd mkcert
go build -ldflags "-X main.Version=$(git describe --tags)"
go install -v
mkcert -install
mkcert localhost
Then install and run local-ssl-proxy:
npm install -g local-ssl-proxy
local-ssl-proxy --key localhost-key.pem --cert localhost.pem --source 8000 --target 8101
Now you can run the core software:
cd core && air
And now the server can be accessed at https://localhost:8000.
See the quick reference for the short form of this information.
Key combo:
A +
B +
B +
...
from any mode
Key combo:
A +
Knob X
from any mode
The Tempo feature offers dual methods for precision tempo control.
First, you can adjust dynamically by holding A and rotating Knob X—with the middle position representing the original BPM, turning fully clockwise for double speed, and turning fully counter-clockwise for half speed.
Secondly, you can hold A and tap B to manually tap in the tempo, which ranges from 30 to 300 BPM.

In both methods, the newly set tempo is briefly displayed, providing immediate visual confirmation of adjustments. This feature ensures that users can easily synchronize their audio to the desired pace.
Key combo:
1-16
from jump mode
Key combo:
A +
1-16
from mash mode
In jump mode, pressing any of the 16 keys will “jump” the sample between slices. The slice position depends on what is set in the Zeptocore tool. The Zeptocore will instantly crossfade from the current position to the beginning of the slice that is jumped to.
JUMP mode.
Key combo:
1-16 +
1-16
from jump mode
Select a slice with 1-16 and then press another key on the 1-16 keypad to initiate a retrigger effect on the selected slice. The retrigger rate will depend on the second key press, with 1 being the fastest rate and 16 being the slowest rate.
If you want pitch up/down effects to be applied to the retriggering, you can enable the Retrigger Setting under the effects (A + 15 in jump mode).
JUMP mode to do a retrigger.
Key combo:
1-16 +
1-16 +
1-16
from jump mode
Select a slice with 1-16 and then press another key on the 1-16 keypad. Subsequently, press a third key on the 1-16 keypad. This action will create a loop between the first and second slices pressed.

JUMP mode to activate looping.
Key combo:
B +
1-16 +
1-16
from any mode
To change samples, you can hold B and press 1-16 to select a bank. While still holding B, press another 1-16 to select the sample. The current sample will be instantly faded out (within 10 ms), and the next sample will load at the position where the current sample is playing.
B will select a bank and then sample.Alternatively, you can use the knobs to change samples - C + X will change banks, or C + Y will change samples within the current bank.

C key while turning knobs to change bank/sample individually.
Key combo:
B +
C
from any mode
This key combo will mute the audio but playback and clocking will continue.
If you want to stop everything you need to use start/stop.

Key combo:
B +
D
from any mode
This key combination will mute the audio and stop playback. Pressing it again will restart the audio from the first beat. If you only need to mute the audio without stopping playback, you can use the mute key combination.

Key combo:
B +
Knob X
from any mode
What should this knob do? Let me know by submitting an idea.
Key combo:
B +
Knob Y
from any mode
Rotating this knob clockwise will increase the cutoff frequency of the low pass filter, allowing higher frequencies to pass through. Rotating it counterclockwise will decrease the cutoff frequency, restricting the passage of higher frequencies.

Key combo:
C +
D
from any mode
This key combination will toggle sequence recording. In the JUMP mode, it will record a sequence of jumps. In the MASH mode, it will record a sequence of toggling effects. In the BASS mode, it will record a bass sequence.

Recording a sequence on Zeptocore differs slightly from other devices. The key distinction is that Zeptocore records the time between presses. Therefore, to record a sequence of 4 steps, you will need to make 5 presses. The final press will not be counted as a sequenced step, but it is necessary to determine the duration of the penultimate press.
It is important to note that Zeptocore does not have a concept of time signature. All recorded actions are quantized to 1/96th of a beat, ensuring precise preservation of the recorded press timing. For quantizing the press timing with less resolution, you can utilize the C + Knob Z key combination.
Please be aware that the button combination of C + D also functions to delete a sequence currently stored in the selected slot.
Key combo:
C +
1-16 +
1-16
from any mode
Sequences can be combined into “chains” of sequences, which are saved as new sequences that can be recalled or further chained into new sequences.

To create a sequence chain, follow these steps:
C key (the sequence selector). Lit buttons indicate where sequences are stored, while unlit buttons signify empty slots.C key, press an unlit button to select the sequence slot where the new chain sequence will be stored.C key, press the lit buttons with existing sequences in any order to create the sequence chain.C key, and the sequence chain will be automatically generated and saved in the slot chosen in step #2.If there are no free slots available, you cannot create sequence chains. In such cases, you can delete a sequence by selecting it (C + 1-16) and then deleting it (C + D).
Key combo:
C +
Knob X
from any mode
You can change the current bank using this combination.
You can also change banks + samples simultaneously using button presses.
C key while turning knobs to change bank/sample individually.
Key combo:
C +
Knob Y
from any mode
You can change sample in the current bank using this combination
You can also change banks + samples simultaneously using button presses.
C key while turning knobs to change bank/sample individually.
Key combo:
D +
Knob X
from any mode
Adjust the probability of random jumping by increasing it when turning the knob clockwise.
If you want to maintain sequence lock, you can use the sequence lock combo.
Key combo:
D +
Knob Y
from any mode
Adjust the probability of random retrigging by increasing it when turning the knob clockwise.
If you wish to maintain sequence lock, you can utilize the sequence lock combination.
Key combo:
5 +
6 +
5
from any mode
The Zeptocore tool can be utilized to configure the one-shot mode for each sample. On the device, you can use this combination to toggle the one-shot mode on and off. When in one-shot mode, the sample will stop playing upon reaching the end of the sample (as opposed to default playback mode, detailed further in Play mode).
One-shot mode will show ONESHOT ON when enabled and ONESHOT OFF when disabled.

Key combo:
9 +
12 +
10 +
11
from any mode
There are two types of resampling in Zeptocore - linear and quadratic. By default, resampling is conducted linearly, which may introduce artifacts that sound “grainy” or “lofi”. An alternative mode is quadratic resampling, which offers slightly better audio quality but at a higher CPU cost. In cases where the CPU load surpasses a threshold (which can happen with multiple effects), quadratic resampling may lead to more frequent intermittent glitches.
When in linear resampling mode, it will display LINEAR, and when in quadratic mode, it will show QUAD.
Key combo:
1 +
2 +
3 +
4
from any mode
Sequence lock mode, when activated, will synchronize the sequence to a global clock. This ensures that manipulations to the sequence (such as jumping) will revert back to the intended beat position. Sequence lock mode will show LOCK ON when enabled and LOCK OFF when disabled. The sequence lock is enabled by default.

Key combo:
5 +
6 +
7 +
8
from any mode
Tempo matching involves adjusting the playback speed of a sample by a multiplier to align with the ratio between the sample’s BPM (set in the tool) and the BPM of the current tempo in Zeptocore. Typically, this adjustment is configured per sample when loading samples onto Zeptocore, but it can also be adjusted on the fly.
When enabled, the Tempo Match mode will show MATCH ON, and when disabled, it will display MATCH OFF.
This setting can be customized on a file-by-file basis using the tool.
Key combo:
13 +
9 +
5 +
1 +
15 +
11 +
7 +
3
from any mode
The Sync Out feature enables Zeptocore to output a sync signal through the left channel of the output. This signal channel can be utilized with external equipment that accepts a clock pulse.
When enabled, the Sync Out mode will show SYNC ON, and when disabled, it will display SYNC OFF.

Each effect can be adjusted using Knob Z to change the probability of occurrence from none (fully counter-clockwise) to often (fully clockwise).
Refer to the quick reference for a concise version of this information.
Key combo:
2
from mash mode
(or
A +
2
from jump mode)
Knob X / Y: loss type / loss amount
The Loss effect simulates the analog imperfections of a worn tape or faulty radio transmission. It provides controls for adjusting the type and amount of degradation, allowing you to achieve vintage or distressed audio textures.
Key combo:
6
from mash mode
(or
A +
6
from jump mode)
Knob X / Y: feedback / duration
The Delay effect introduces a feedback delay mechanism where the knobs can finely adjust feedback intensity and delay duration. This feature allows for extensive creative flexibility, which can extend into overclipping for intense audio textures.
Key combo:
8
from mash mode
(or
A +
8
from jump mode)
Knob X: duration
The Repeat effect uses zero-crossings to loop audio segments that best match the requested duration. This effect is distinct from delay as it overtakes the audio rather than adding to it, allowing for speeds up to the audio rate.
Key combo:
9
from mash mode
(or
A +
9
from jump mode)
Knob X: duration
The Tighten effect uses a gate to cut off the audio towards the end of a step, based on the duration setting. This clipping of the ends helps create a more defined and tighter sound profile.
The gate effect is a tool used in audio engineering to control the volume level of a signal. It works by allowing or blocking the passage of audio based on a set threshold. This can help eliminate unwanted noise or shape the dynamics of a sound.
Key combo:
10
from mash mode
(or
A +
10
from jump mode)
Knob X / Y: expanse / dry/wet
The Expand effect will create a reverberation effect on the sound. Please note that this effect consumes more CPU and memory than other effects. Using combinations of effects may create instabilities in the system.
I apologize for any inconvenience. When encountering issues due to low battery levels, I recommend first replacing both batteries with fresh ones. Try powering the device using USB-C to check if it resolves the issue. I also suggest using high-quality alkaline batteries instead of carbon zinc ones, as alkaline batteries maintain voltage better over time and are less likely to cause operational problems.
To adjust the volume, hold A and turn Knob Z. For additional details, refer to this section.
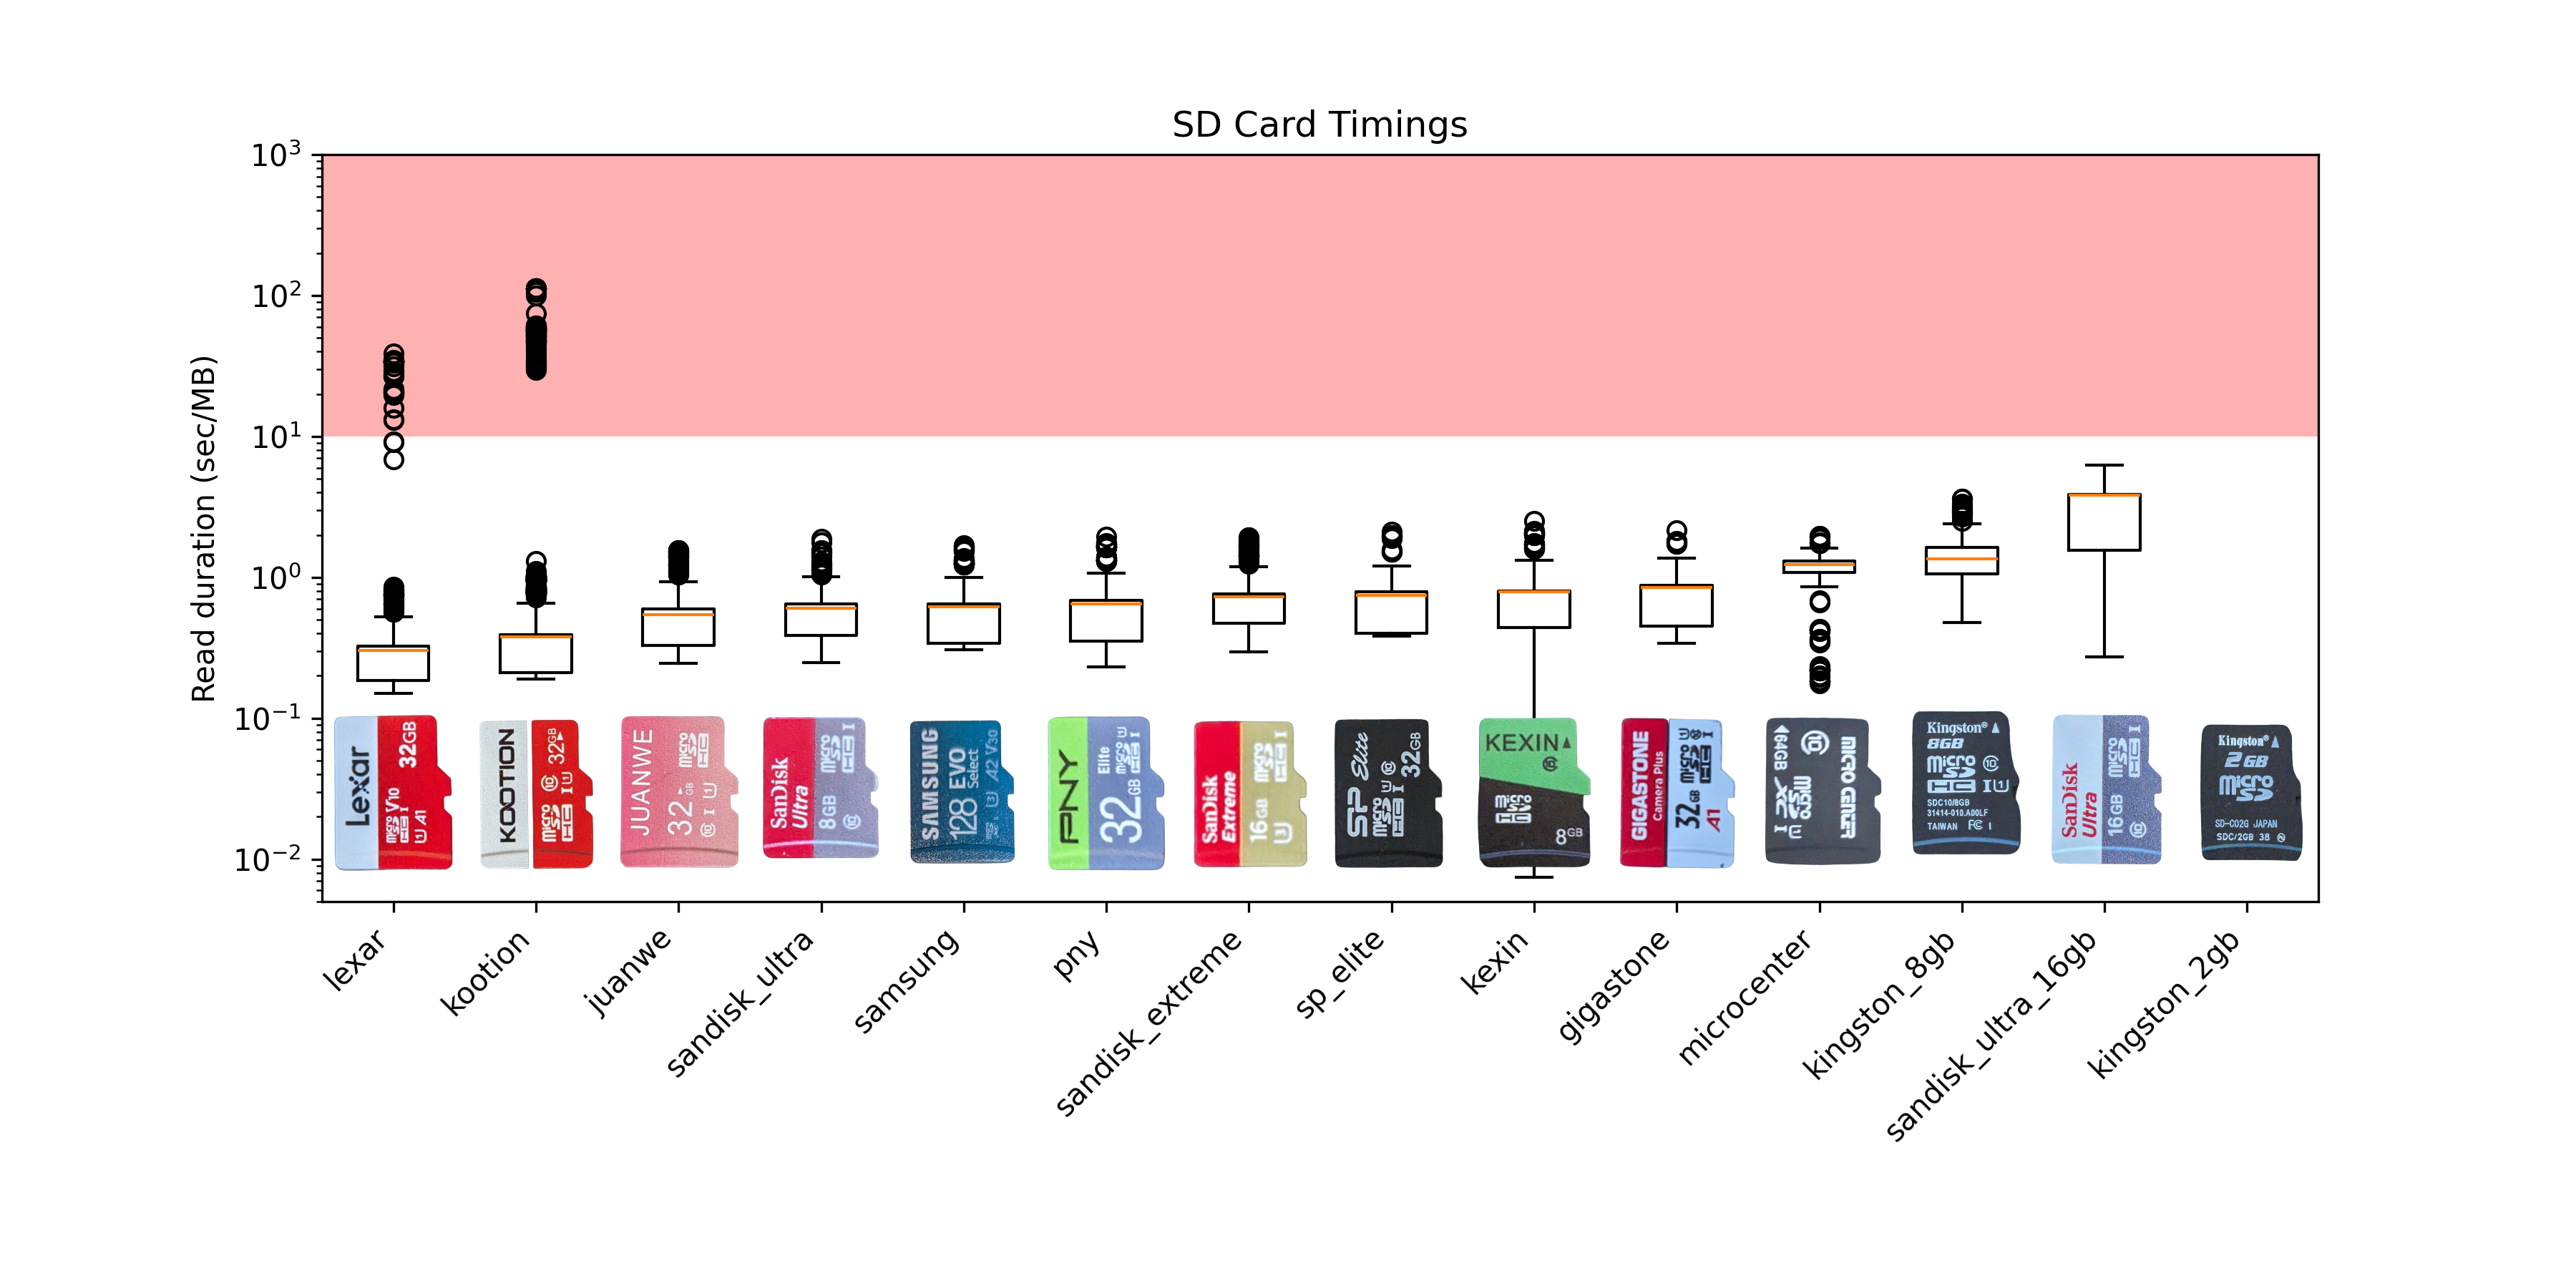
I apologize for any issues you may be experiencing. The audio drops are likely related to the SD cards being used. Not all SD cards are equal, as some may have high latencies that can cause audio disruptions. Refer to the answer to this question to identify the best SD card for optimal performance. When glitches occur, the zeptocore can typically recover, producing varying glitch sounds. However, in rare cases, a restart may be necessary. The provided SD card should be suitable, but if you encounter ongoing issues, please inform me.
You can easily start and stop by holding B and then pressing D. If the audio is playing, it will stop, and if it’s already stopped, it will start playing from the beginning. Additional details can be found in this section.
To change samples using the buttons, follow these steps: hold B and press 1-16 to choose a bank. While still holding B, press another 1-16 to select the sample.
Alternatively, you can change the sample by selecting a bank with a knob or by selecting a sample with a knob. For more information, refer to changing banks with a knob and changing samples with a knob.
C key while turning knobs to change bank/sample individually.If you purchased the zeptocore from me, I have made efforts to supply the best SD card available.
Please note that not all SD cards are equal. Terms like “high-speed,” “A1,” or “U3” on the card do not necessarily indicate its actual speed performance.
Below is a list of known good and bad cards:
Do not use these cards! They may appear to work, but they can cause spurious glitches.
Here is my personal investigation into the cards and a comparison of the options available to me. The cards on the far left experience random dropouts, while the cards on the far right are deemed too slow. The cards in the middle are considered the best:
The schematics are open-source - you are welcome to utilize them to customize the device according to your preferences. If you intend to produce boards based on my schematics, I kindly ask for your financial support to help sustain the development of future devices.

When you power on the device, you can quickly check the current version by observing the flashing “Z” along with a version number such as “1.0.0,” indicating version 1.0.0.

| Action | Combo | Description | Mode |
| Jump | 1-16 | Crossfade into new slice position | jump |
| Jump | A + 1-16 | Crossfade into new slice position | mash |
| Retrigger | 1-16 + 1-16 | Creates retrig ramp, speed depends on second press | jump |
| Loop sequence | 1-16 + 1-16 + 1-16 | Loop a sequence between first and second press | jump |
| Octave +1 | A + 1-16 | Increase octave in the bass mode | bass |
| Mode jump | A + B | Switches into jump mode |
any |
| Mode mash | A + C | Switches into mash mode |
any |
| Mode bass | A + D | Switches into bass mode |
any |
| Tempo | A + B + B + ... | Sets new tempo based on the cadence of B presses | any |
| Tempo | A + Knob X | Sets new tempo based on the position of knob X | any |
| Pitch | A + Knob Y | Change pitch | any |
| Volume | A + Knob Z | Change volume | any |
| Change samples | B + 1-16 + 1-16 | The first 1-16 loads the bank, and then the next is the sample | any |
| Mute | B + C | Mutes playback but does not stop playback | any |
| Start/Stop | B + D | Toggles the playback to start or stop | any |
| Unassigned | B + Knob X | Let me know what this should do | any |
| Filter sweep | B + Knob Y | Sweep the low pass filter | any |
| Bass volume | B + Knob Z | Change the volume of the bass | any |
| Select sequence | C + 1-16 | Select sequence slot for current mode | any |
| Play/stop sequence | C + B | Toggle sequence playback for current mode | any |
| Record sequence | C + D | Toggle sequence recording for current mode | any |
| Chain sequence | C + 1-16 + 1-16 | Chain sequences together | any |
| Change banks (with knob) | C + Knob X | Change banks with a knob | any |
| Change samples (with knob) | C + Knob Y | Change samples with a knob combo | any |
| Quantize | C + Knob Z | Quantize the current playing sequence | any |
| Select save | D + 1-16 | Select save slot | any |
| Load save | D + B | Load from current save slot | any |
| Create save | D + C | Save into the current slot | any |
| Random jump | D + Knob X | Change probability of random jump | any |
| Random retrig | D + Knob Y | Change probability of random retrig | any |
| Random tunnel | D + Knob Z | Change the probability of tunneling | any |
| One-shot | 5 + 6 + 5 | Toggle one-shot mode on/off on current sample | any |
| Change play mode | 7 + 8 + 7 | Change between play modes | any |
| Resampling | 9 + 12 + 10 + 11 | Toggle between linear and quadratic resampling modes | any |
| Slice playback | 1 + 2 + 1 | Change between the slice playback modes | any |
| Sequence lock | 1 + 2 + 3 + 4 | Toggle sequence locking mode | any |
| Tempo match | 5 + 6 + 7 + 8 | Toggle tempo matching mode | any |
| Retrigger pitching | 9 + 10 + 11 + 12 | Toggle retrigger pitching | any |
| Sync out | 13 + 9 + 5 + 1 + 15 + 11 + 7 + 3 | Toggle sync out mode | any |
| Snares | 13 + 10 + 7 + 4 | Play only the snares found in the sample | any |
| Kicks | 4 + 7 + 10 + 13 | Play only the kicks found in the sample | any |

| Effect | Key | Knob X | Knob Y | Description |
| Saturation | 1 | preamp | Adds warmth, depth without distortion, uses double sine | |
| Loss | 2 | loss type | loss amount | Simulates analog imperfections, type and amount control |
| Fuzz | 3 | preamp | postamp | Adds rich fuzz-like distortion, tunable intensity |
| Bitcrush | 4 | bits | frequency | Reduces fidelity to mimic early digital audio |
| Timestretch | 5 | Timestretch of the original audio | ||
| Delay | 6 | feedback | duration | Delay controls feedback and duration of delay. |
| Comb filter | 7 | left spread | right spread | Creates tight comb delay filter |
| Repeat | 8 | duration | Loops audio at zero-crossings, overtakes original audio | |
| Tighten | 9 | duration | Gates audio, clips ends for tightness | |
| Expand | 10 | expanse | dry/wet | Expands the sound. |
| Circulate | 11 | rate | depth | Pans audio for immersive spatial experience |
| Scratch | 12 | rate | Simulates record scratch, rapidly changes playback speed | |
| Lower | 13 | duration | depth | Activates low pass filter, emphasizes lower tones |
| Pitch | 14 | duration | depth | Adjusts pitch up or down with depth, duration |
| Reverse | 15 | Reverses audio playback and sequence direction | ||
| Tapestop | 16 | duration | Drops pitch, halts playback |