
Instrument manual
EZEPTOCORE Guide
Start with a loop, then decide how far it should wander. EZEPTOCORE streams samples from an SD card and lets you rearrange their slices, add effects, and follow a modular clock. It is an 8 HP Eurorack instrument developed by Infinite Digits with Maneco Labs, based on Zeptocore.
Download the original v7.1.1 manual (PDF, 3 MB)
The illustrations come from manual v7.1.1. The text follows firmware v8.1.0, including start-on-demand playback; screenshots show the earlier sample tool. Use the firmware selector for downloads.
Get your first loop playing
If the module is not mounted yet, start with installation. For the first listen, leave the CV inputs unpatched so you can hear what each knob does on its own.
- With the case off, insert an SD card prepared with the sample tool. Patch the two audio outputs marked OUT to your mixer or output module, and start with its listening level low.
- Turn AMEN and BREAK fully counterclockwise. Set JUMP to 12 o’clock. These positions play the sample in order without random breaks.
- Power on the case. Turn TUNNEL to choose a sample; press BANK to cycle through banks. Hold BANK and turn TUNNEL to choose a bank directly.
- If playback is stopped or waiting at startup, press TAP to start. Hold TAP and turn BREAK to set the module’s volume. Turning farther adds saturation and then distortion.
- Choose an EFFECTS position, then raise BREAK a little. Turn AMEN to hear repeating slice patterns, and move JUMP away from center to introduce jumps.
For a clocked setup that should power on stopped, choose Startup playback → Wait for clock or button in the sample manager’s Settings.
To hear the original loop again, return AMEN and BREAK fully left and JUMP to center. Any BLUE or RED mode effects you adjusted have their own settings; returning the ordinary knobs does not clear those effects.
Install the module
Allow 8 HP of rack space and approximately 27 mm of depth. Typical power consumption is 135 mA at +12 V and 11 mA at −12 V. Check the remaining capacity of each power-supply rail with all your other modules included.
- Switch off the case and unplug its power supply before installing or removing the module.
- Connect the supplied Eurorack power cable to the module and the case’s power bus. Check the connector orientation and power markings at both ends before turning anything on.
- Mount the panel securely and cover unused rack space with blank panels. Keep loose screws and cables clear of the circuit board.
Use the module indoors in a dry, ventilated case. The original manual includes the complete handling instructions and warranty terms.
Demo
EZEPTOCORE streams stereo audio directly from its SD card, then slices, sequences, and transforms it without preloading. Watch the controls in use, then try the patches below.
Core features
- Algorithmic slicingChop a loop into slices and play them in a new order.
- Evolving sequencesRepeat a slice pattern or let it change as it plays.
- Tempo lockExternal clock sync and tap tempo keep playback aligned.
- SD streamingStereo 16-bit, 44.1 kHz audio plays directly from the card.
- 16 × 16 librarySixteen banks hold up to sixteen samples each.
- CV controlModulate effects, sequencing, sample changes, and reset.
- Compact hardware8 HP wide and approximately 27 mm deep.
- Power135 mA at +12 V and 11 mA at −12 V.
- Clock I/OClock input and output with division and multiplication.
Seven EFFECTS positions store combinations of the 16 available effects. BREAK controls how likely those combinations are to happen. You can build your own combinations in the sample-tool settings.
The everyday controls
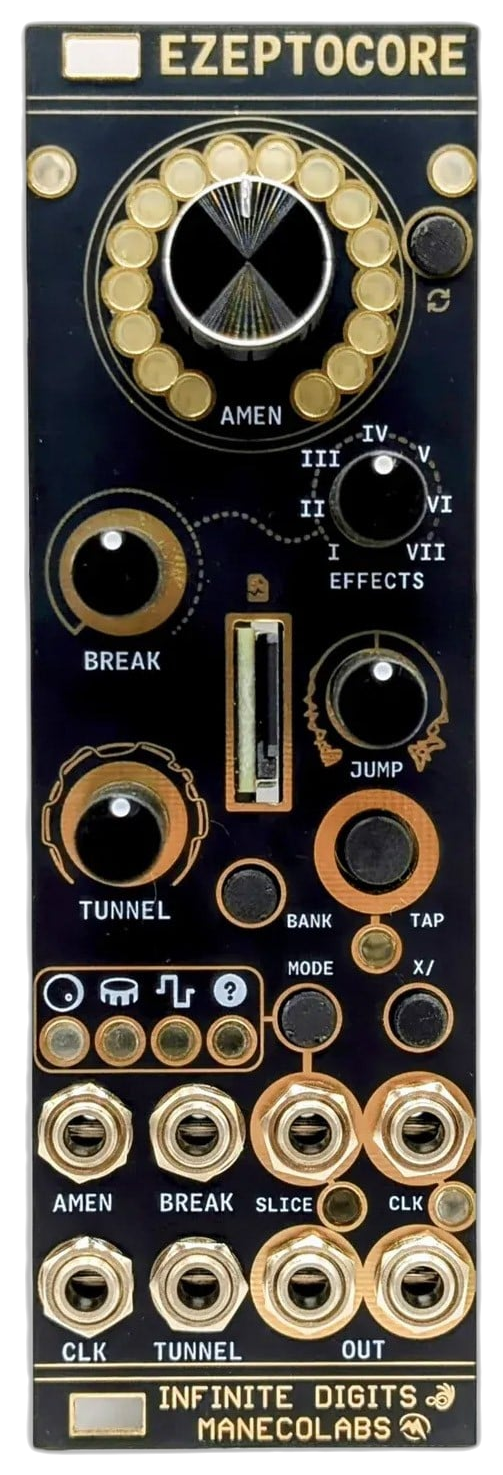
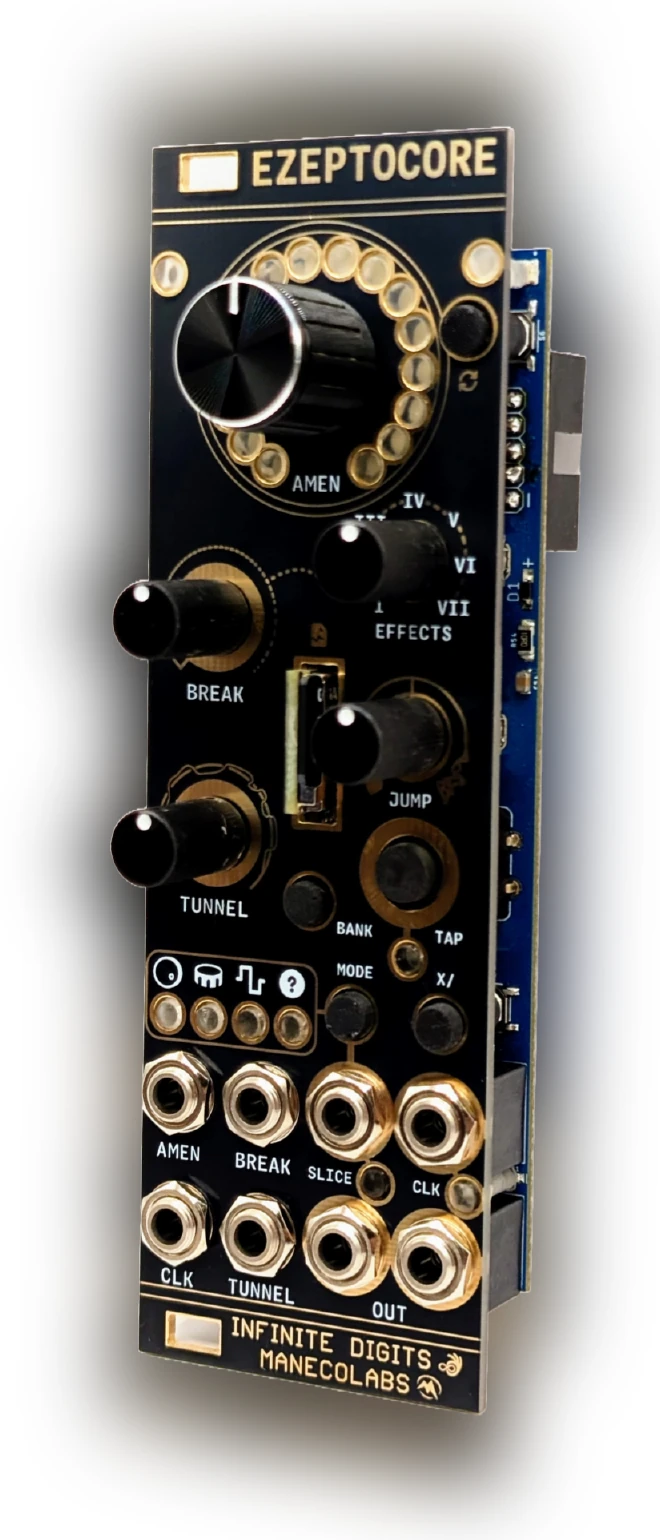
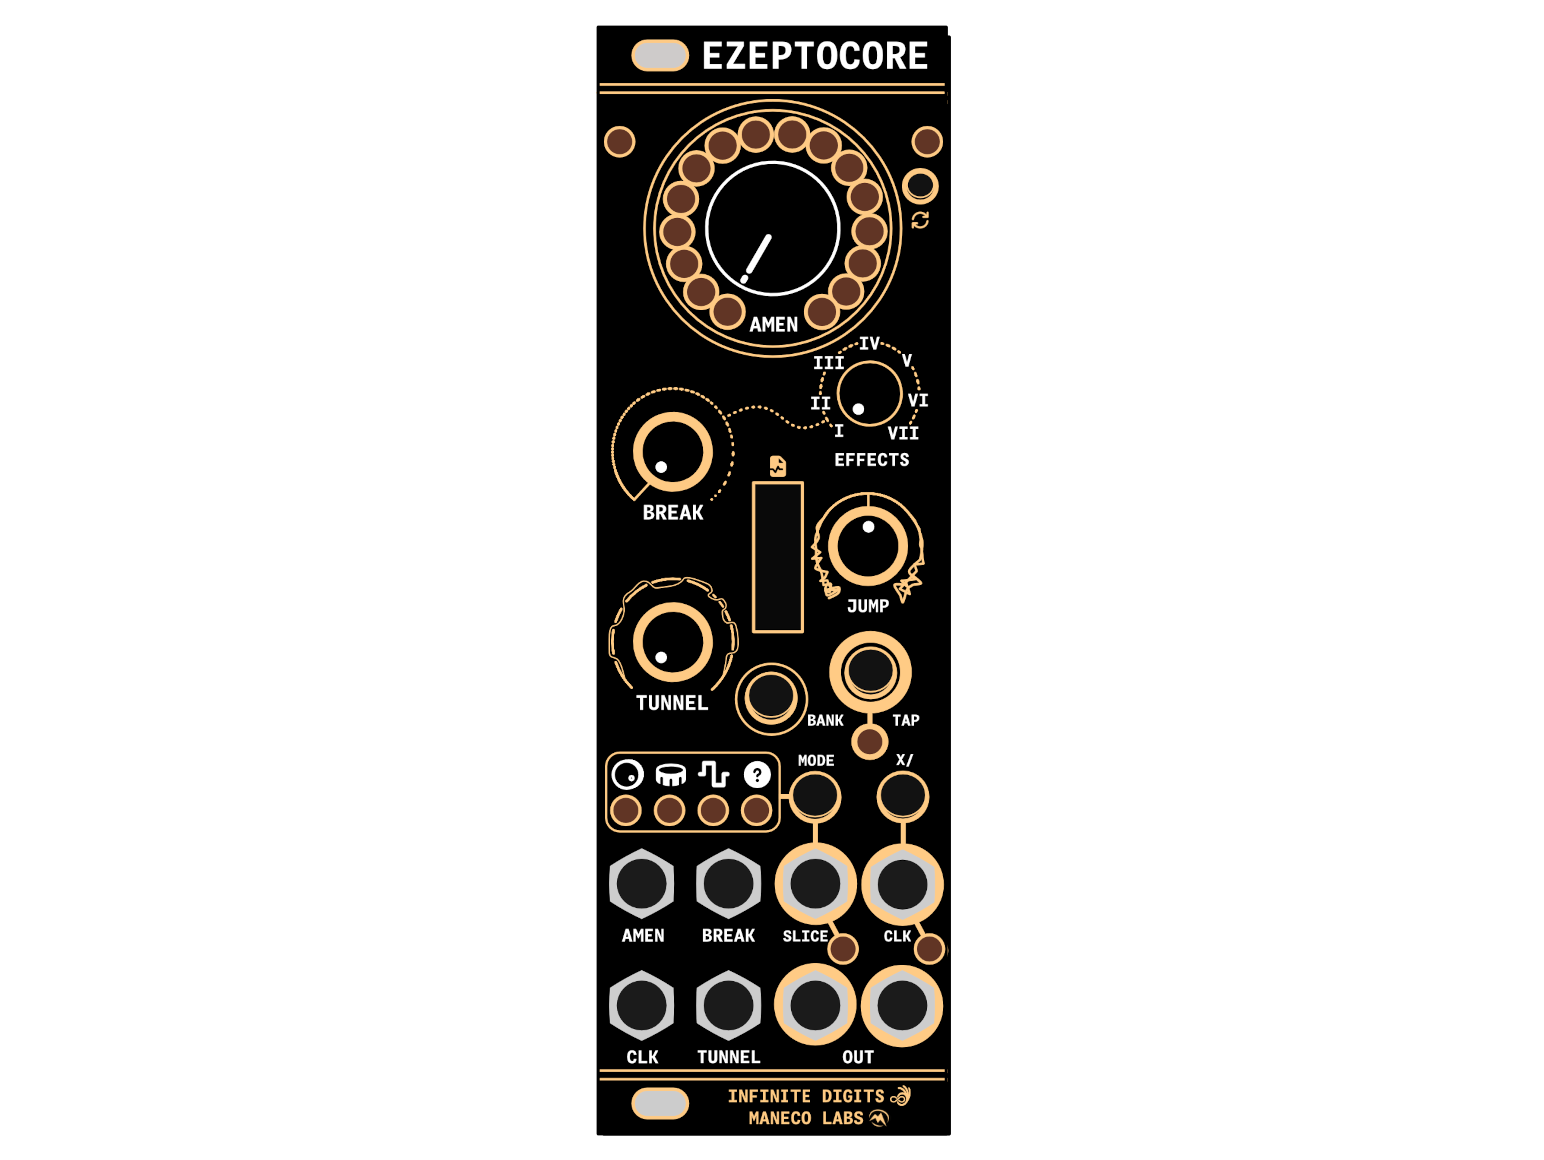
Start here with TAP and MODE released. The large AMEN knob changes the slice sequence; BREAK changes the chance of effects. TUNNEL selects your sound.
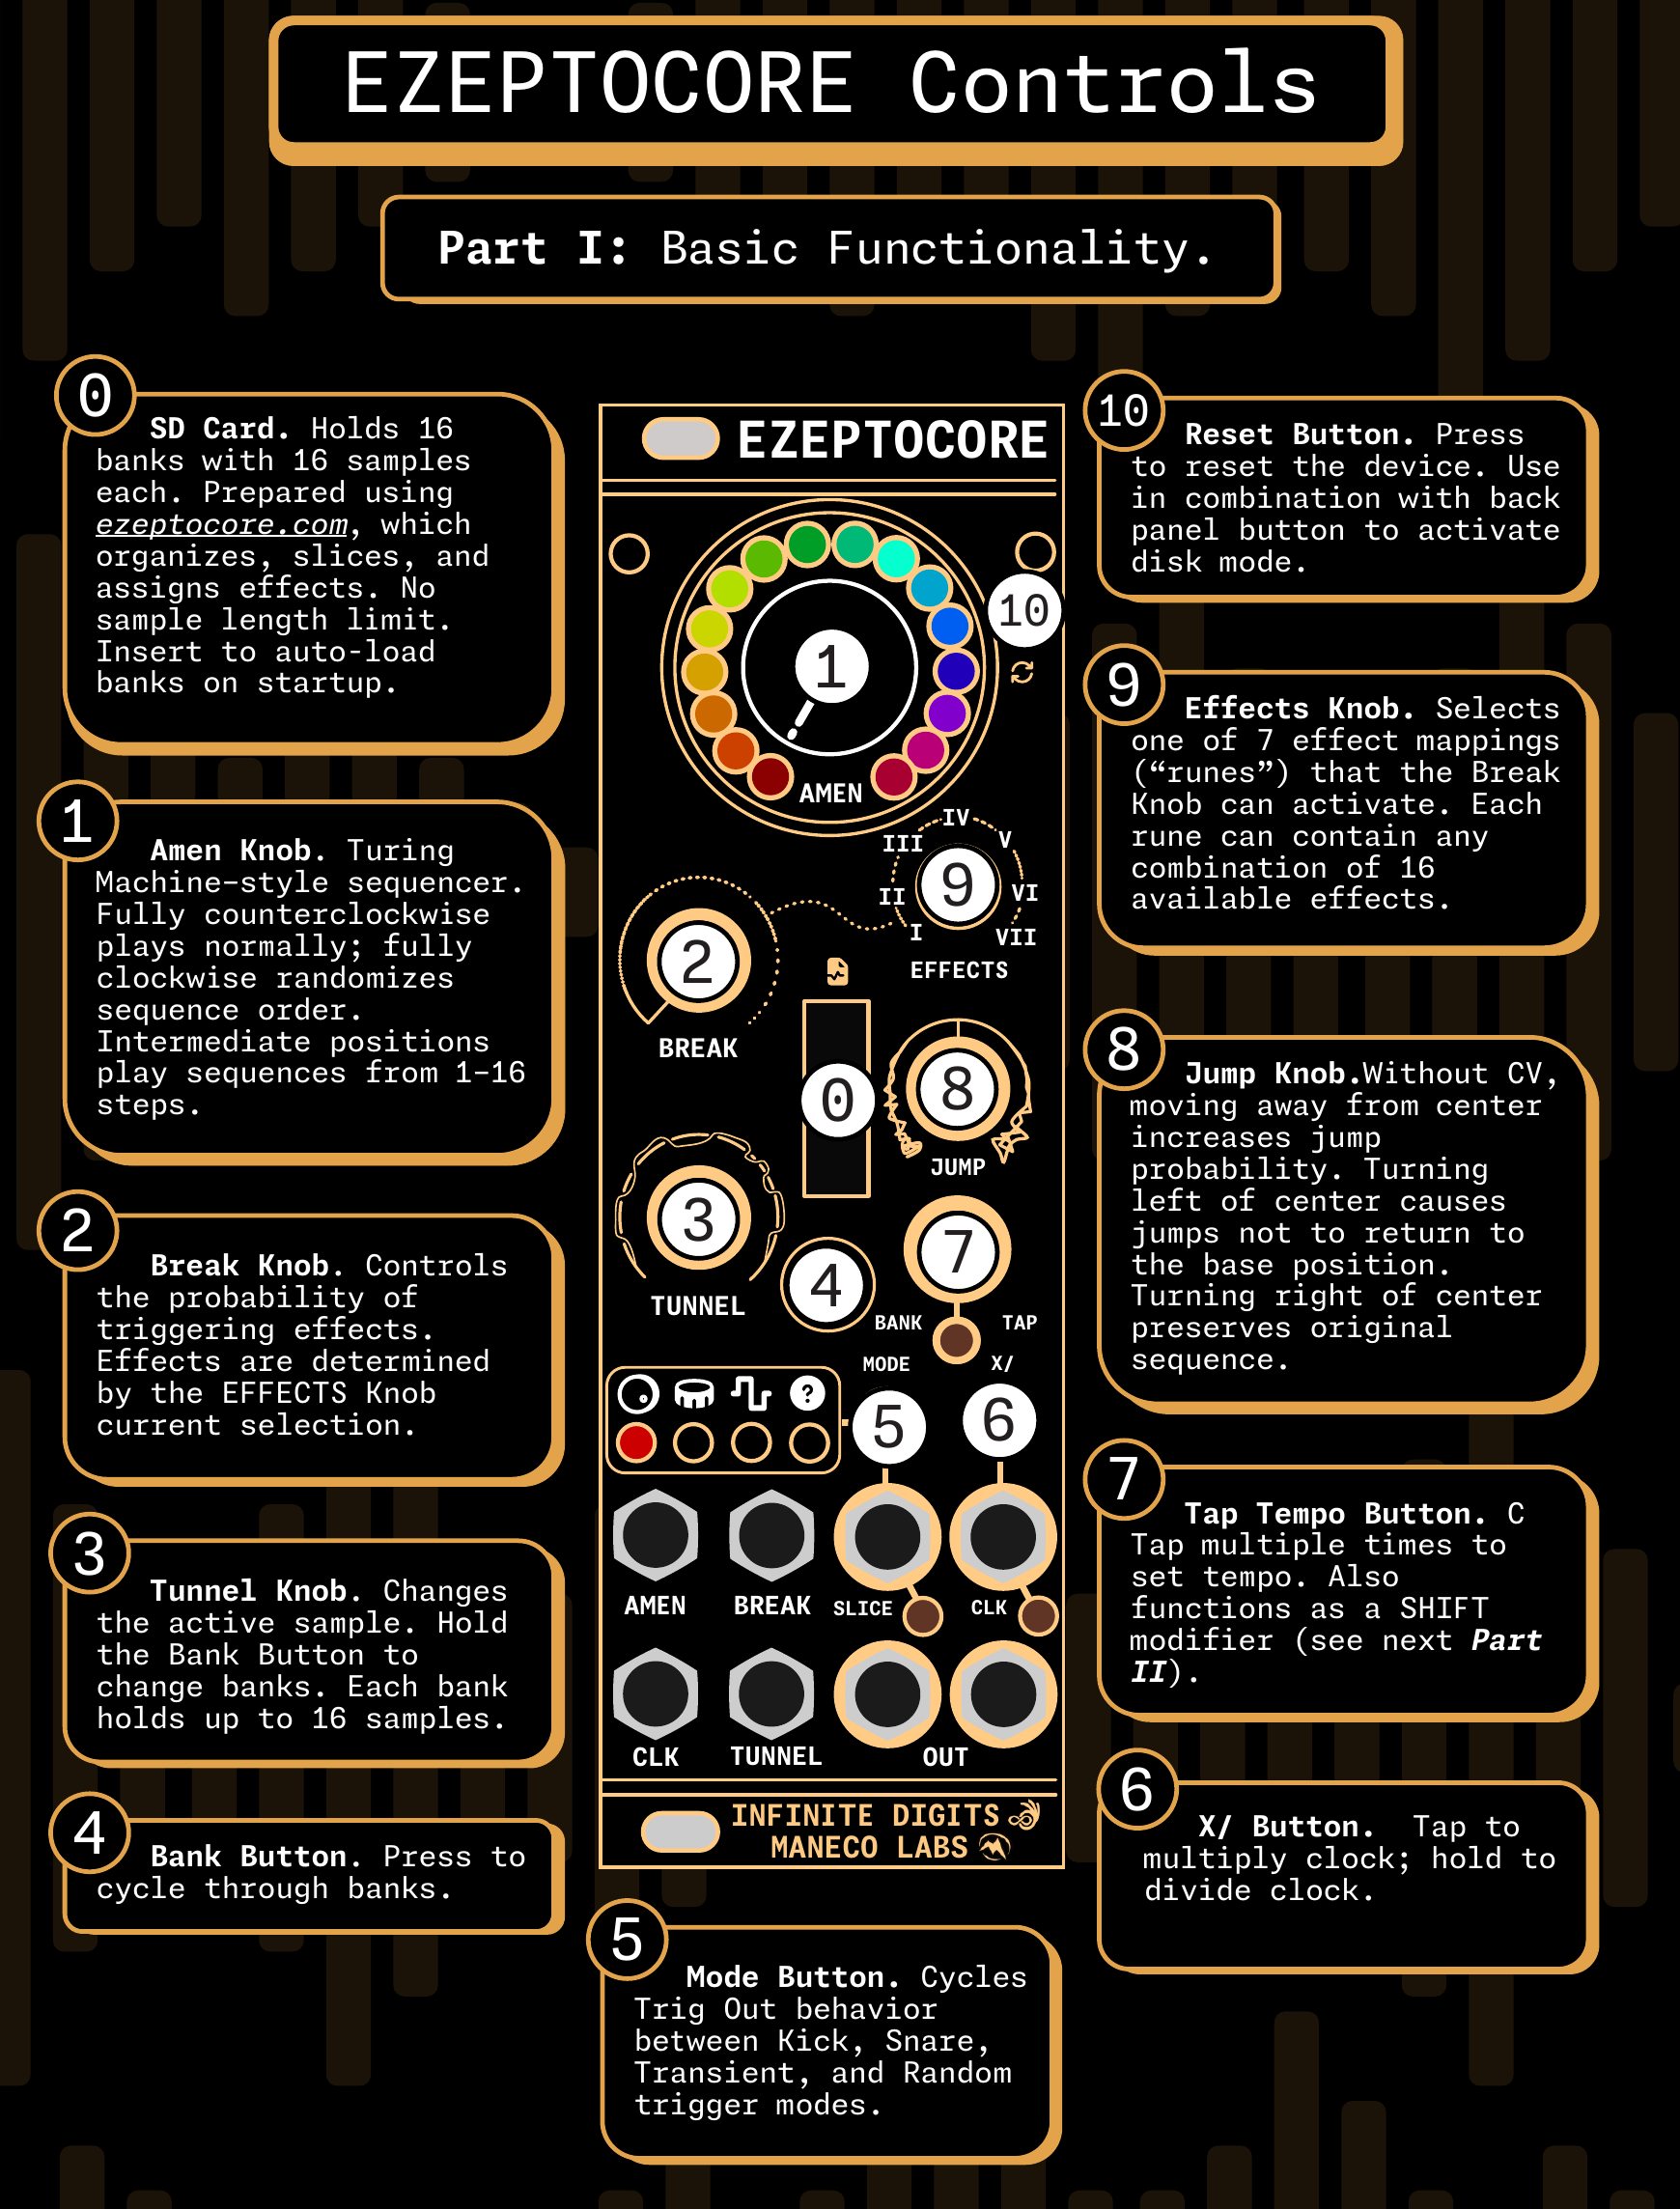
- AMEN
- Fully left plays slices in their original order. Intermediate positions choose repeating sequence lengths. Fully right enables an evolving random sequence. A patched AMEN CV input takes over slice selection; see CV control.
- BREAK
- Sets the probability of activating the effects selected by EFFECTS. Start fully left, then turn clockwise to hear them more often.
- EFFECTS
- Selects one of seven effect mappings, labeled I–VII. Each mapping can contain several effects; configure them in the sample tool.
- JUMP
- With AMEN CV unpatched, center gives no random jumps. Moving away from center increases their probability. Left of center, jumps change the continuing position; right of center, playback returns to the underlying sequence.
- TUNNEL and BANK
- Turn TUNNEL to select a sample in the current bank. Press BANK to cycle through populated banks, or hold BANK while turning TUNNEL to choose one. The library holds up to 16 banks of 16 samples.
- TAP
- Tap repeatedly to set the internal tempo. Hold it while using another control for BLUE mode.
- X/
- Tap to move toward clock multiplication; hold to move toward clock division. This changes the clock ratio.
- MODE
- Press to cycle the Trigger Out mode: Kick, Snare, Transient, or Random. Hold until the LEDs turn red to use the RED effects.
- RESET and SD card
- The small front-panel RESET button restarts the device. The SD card holds your prepared banks, samples, and settings; the module reads them at startup.
BLUE mode: hold TAP
Hold TAP, move the control you want, then release TAP. These controls let you filter, pitch, gate, and repeat the sample during a performance.
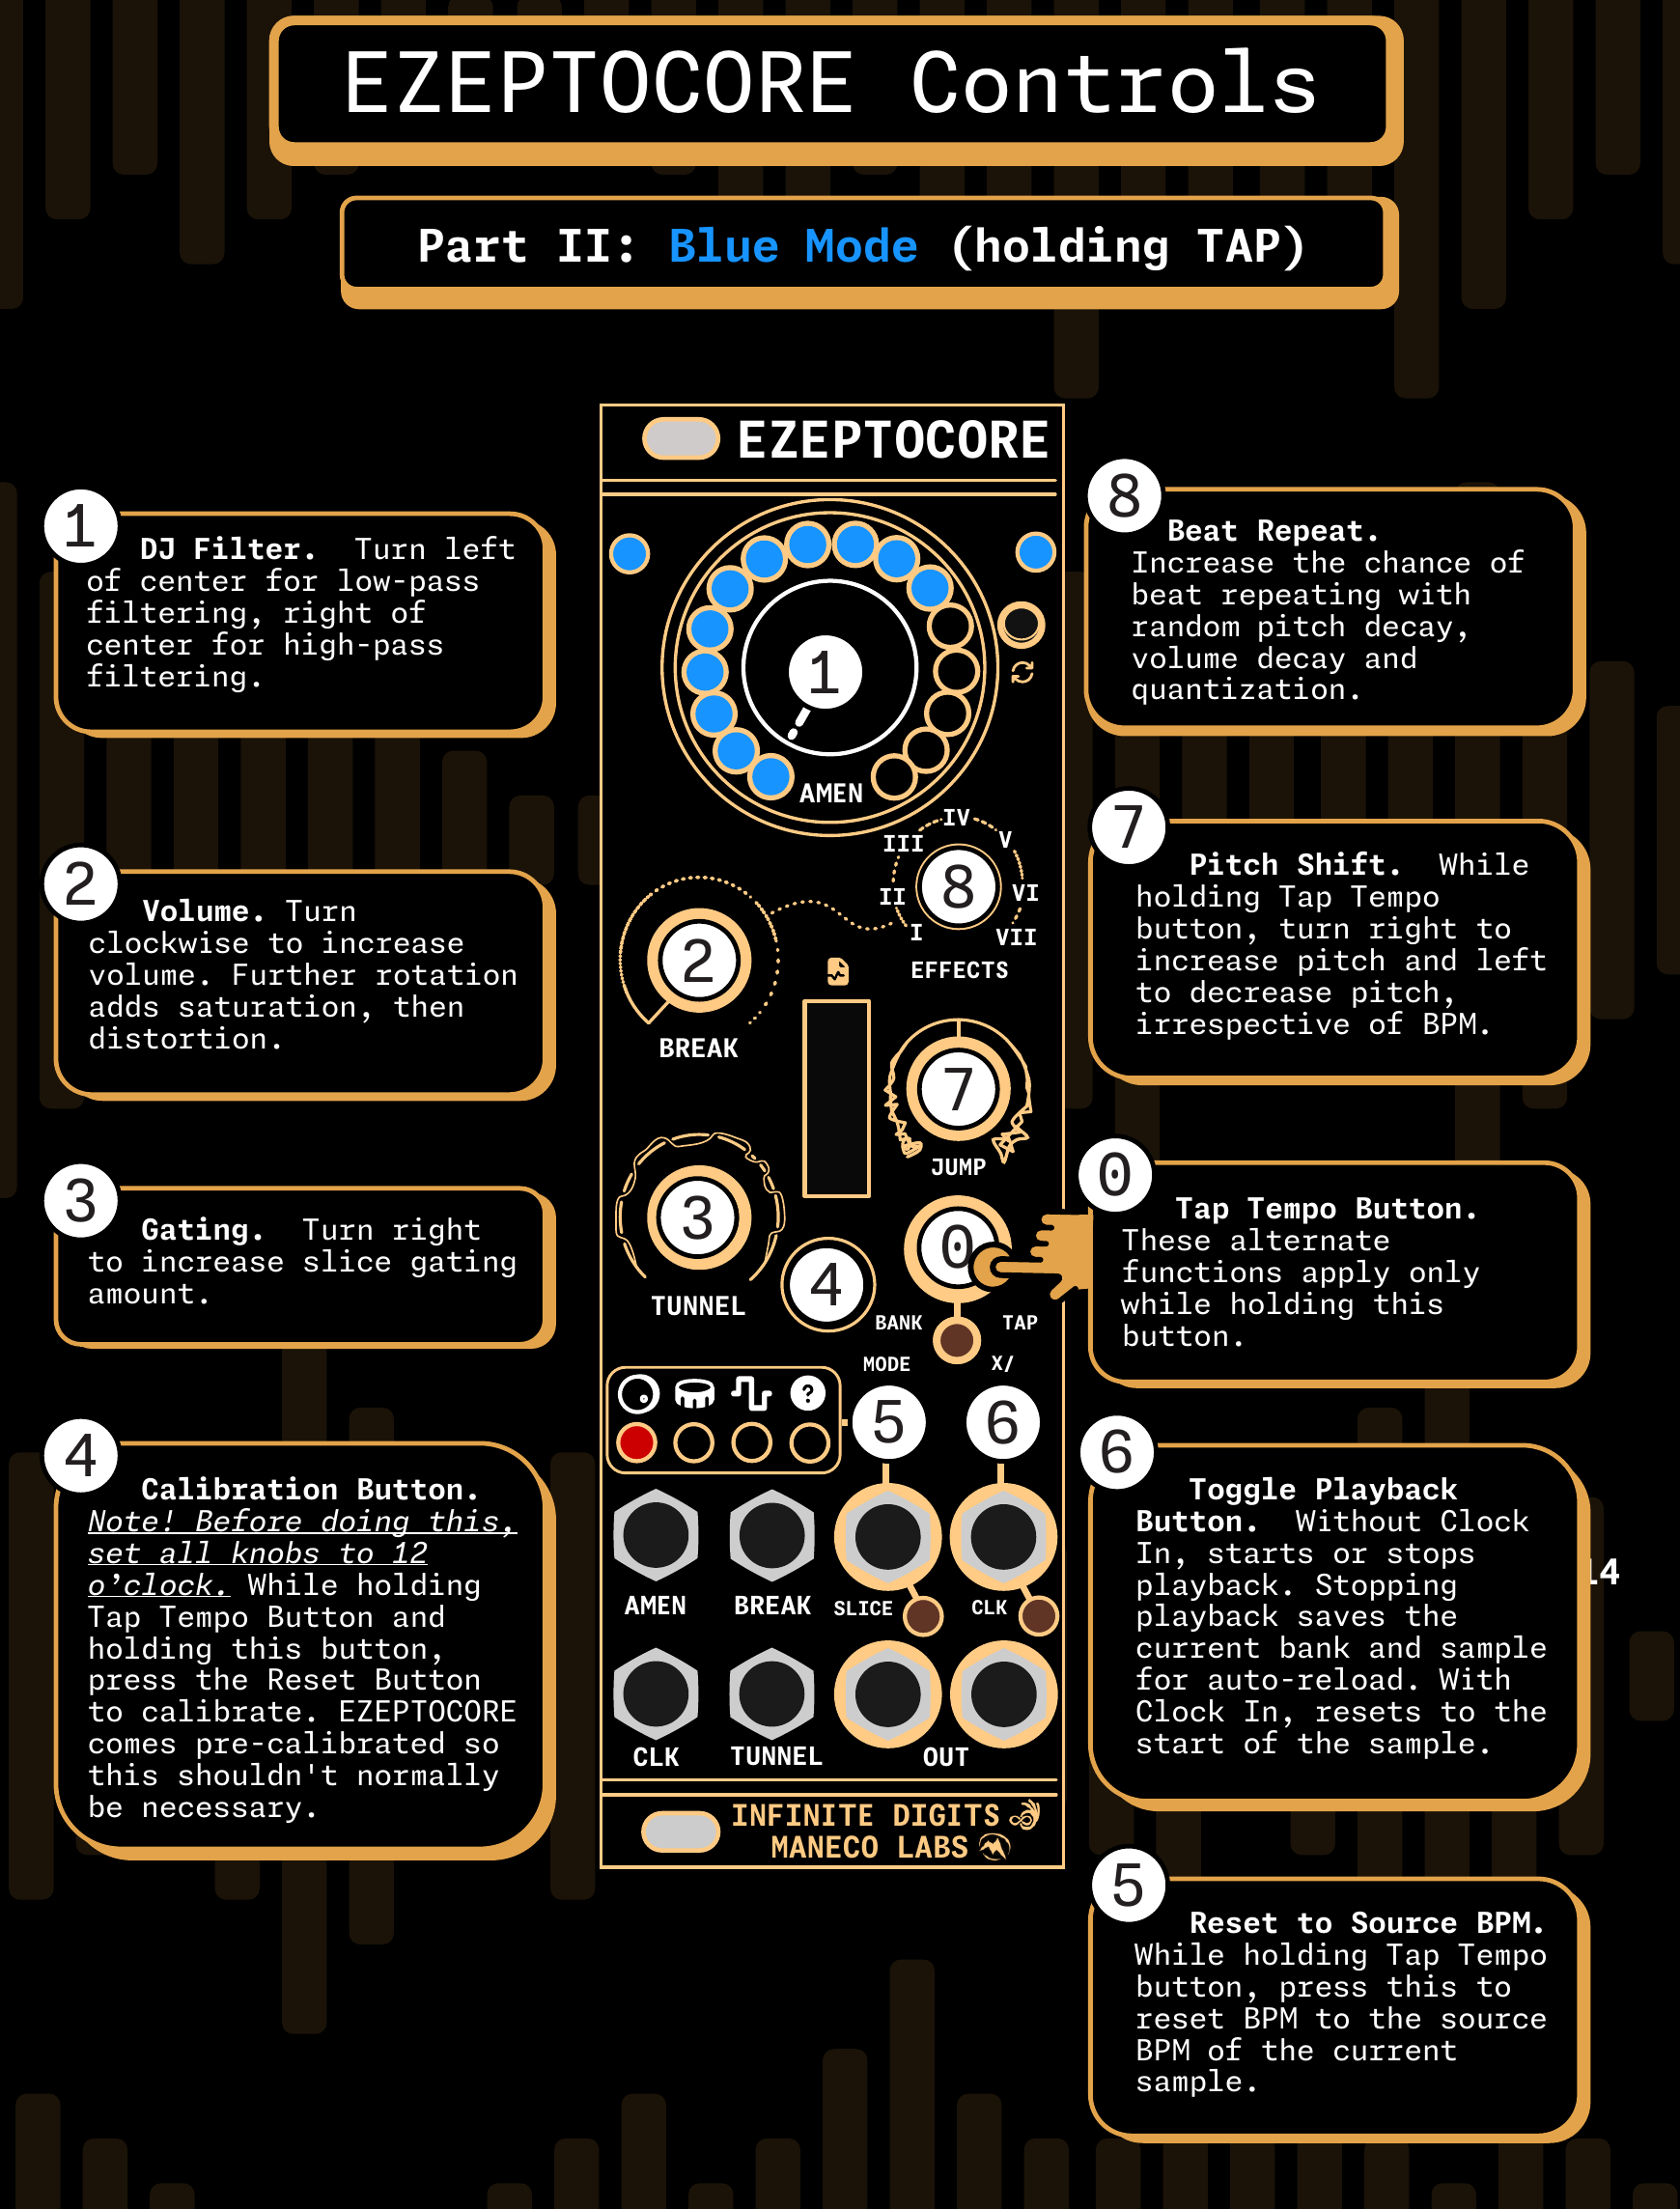
- TAP + AMEN → DJ filter
- Turn left of center for a low-pass filter that removes highs; turn right for a high-pass filter that removes lows. Center leaves the filter open.
- TAP + BREAK → volume
- Turn clockwise to raise the level. Further rotation adds saturation and distortion.
- TAP + TUNNEL → gating
- Turn clockwise to shorten the audible portion of each slice. This leaves more space between hits.
- TAP + JUMP → pitch
- Turn left to lower pitch and right to raise it, independently of the tempo. Center returns to the original pitch.
- TAP + EFFECTS → beat repeat
- Raise the probability of repeats with variations in pitch decay, volume decay, and quantization.
- TAP + X/ → playback
- Hold TAP and press X/ to stop playback. Press TAP to resume, or to start when the module is waiting at startup. Stopping saves the current bank and sample for the next startup. For a reset against an external clock, use TAP + MODE.
- TAP + MODE → tempo or pattern reset
- Without an external clock, restore the sample’s source BPM. With a clock present, realign the pattern to beat one.
- TAP + BANK + RESET → calibration
- Only use this with all five knobs centered. Follow the calibration steps below.
RED mode: hold MODE
Hold MODE until the LEDs turn red before turning a knob. Keep MODE held while adjusting the effect. A normal press also changes the trigger mode, so check the trigger indicator afterward if your patch depends on it.
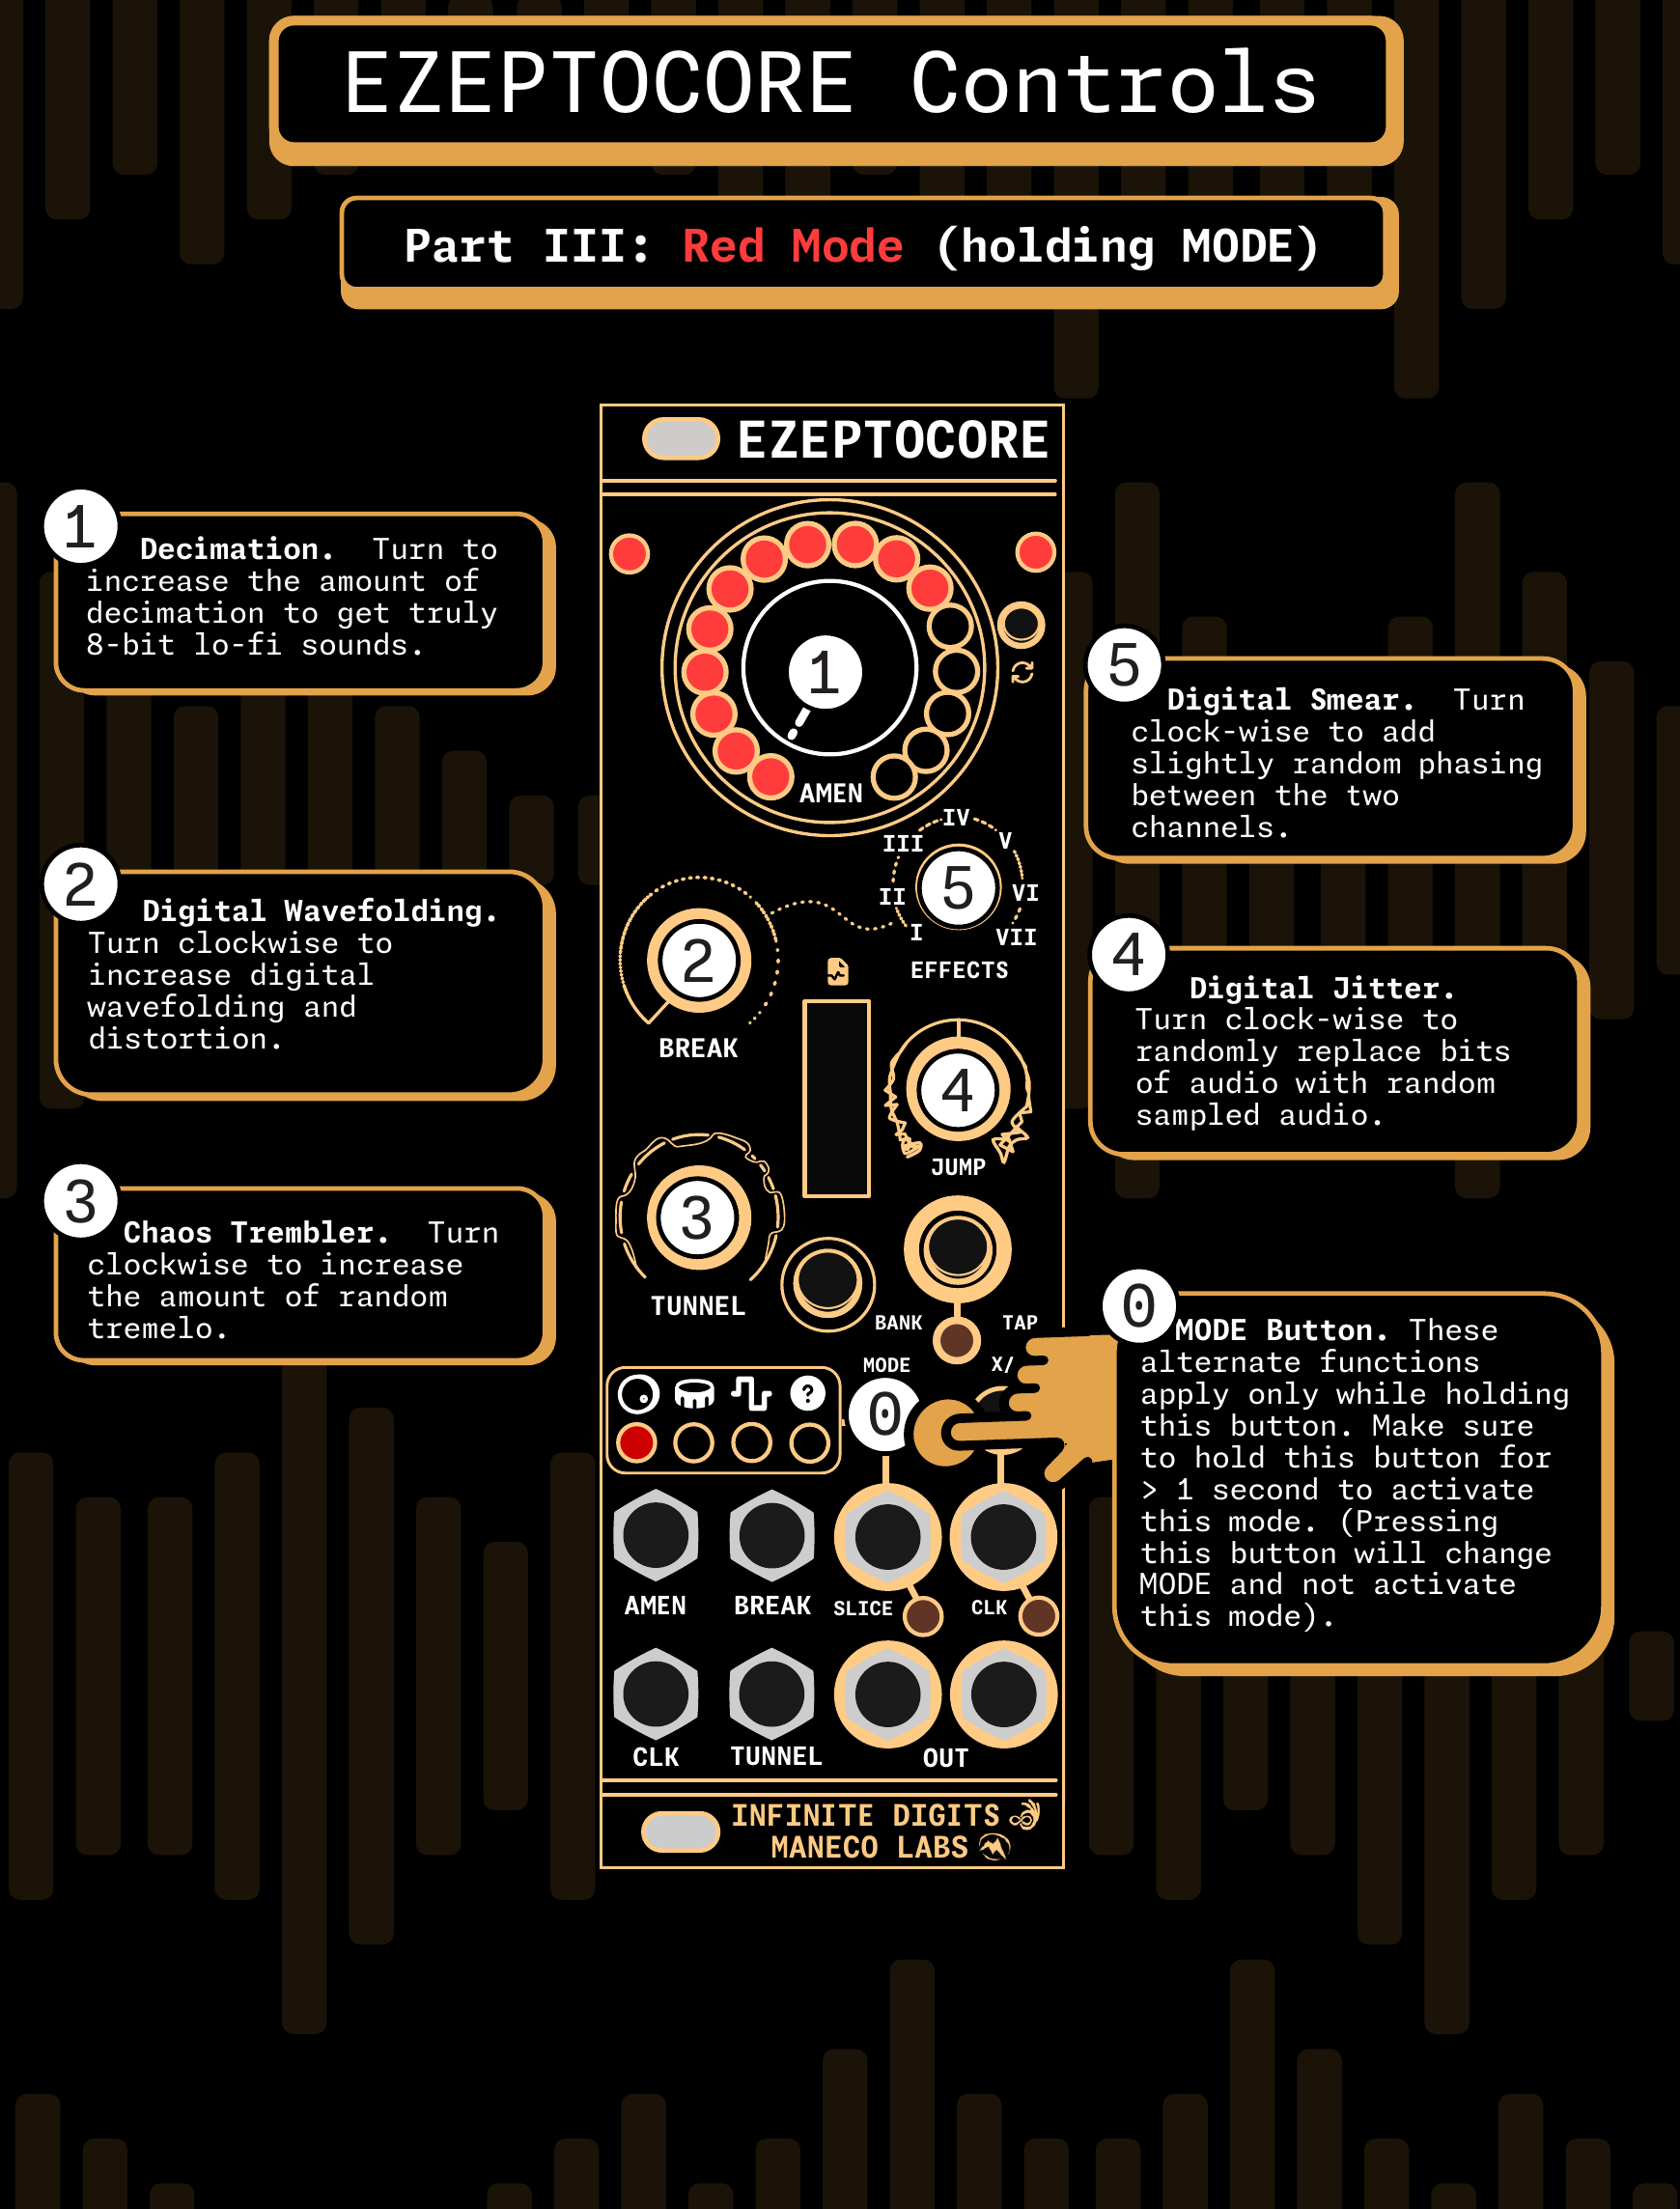
- MODE + AMEN → decimation
- Reduce the audio’s digital resolution for a rough, 8-bit character.
- MODE + BREAK → digital wavefolding
- Increase digital wavefolding and distortion.
- MODE + TUNNEL → Chaos Trembler
- Increase random tremolo: irregular changes in loudness.
- MODE + JUMP → digital jitter
- Introduce fragments of randomly sampled audio.
- MODE + EFFECTS → digital smear
- Add small, changing phase differences between the stereo channels.
Turn the corresponding knob fully counterclockwise while holding MODE to remove that effect. Release MODE to return the knob to its ordinary job.
CV and clock connections
Control voltage lets another module choose slices, select sounds, or change the probability of effects. Configure the input behavior in the sample-tool settings, then copy those settings to the SD card.
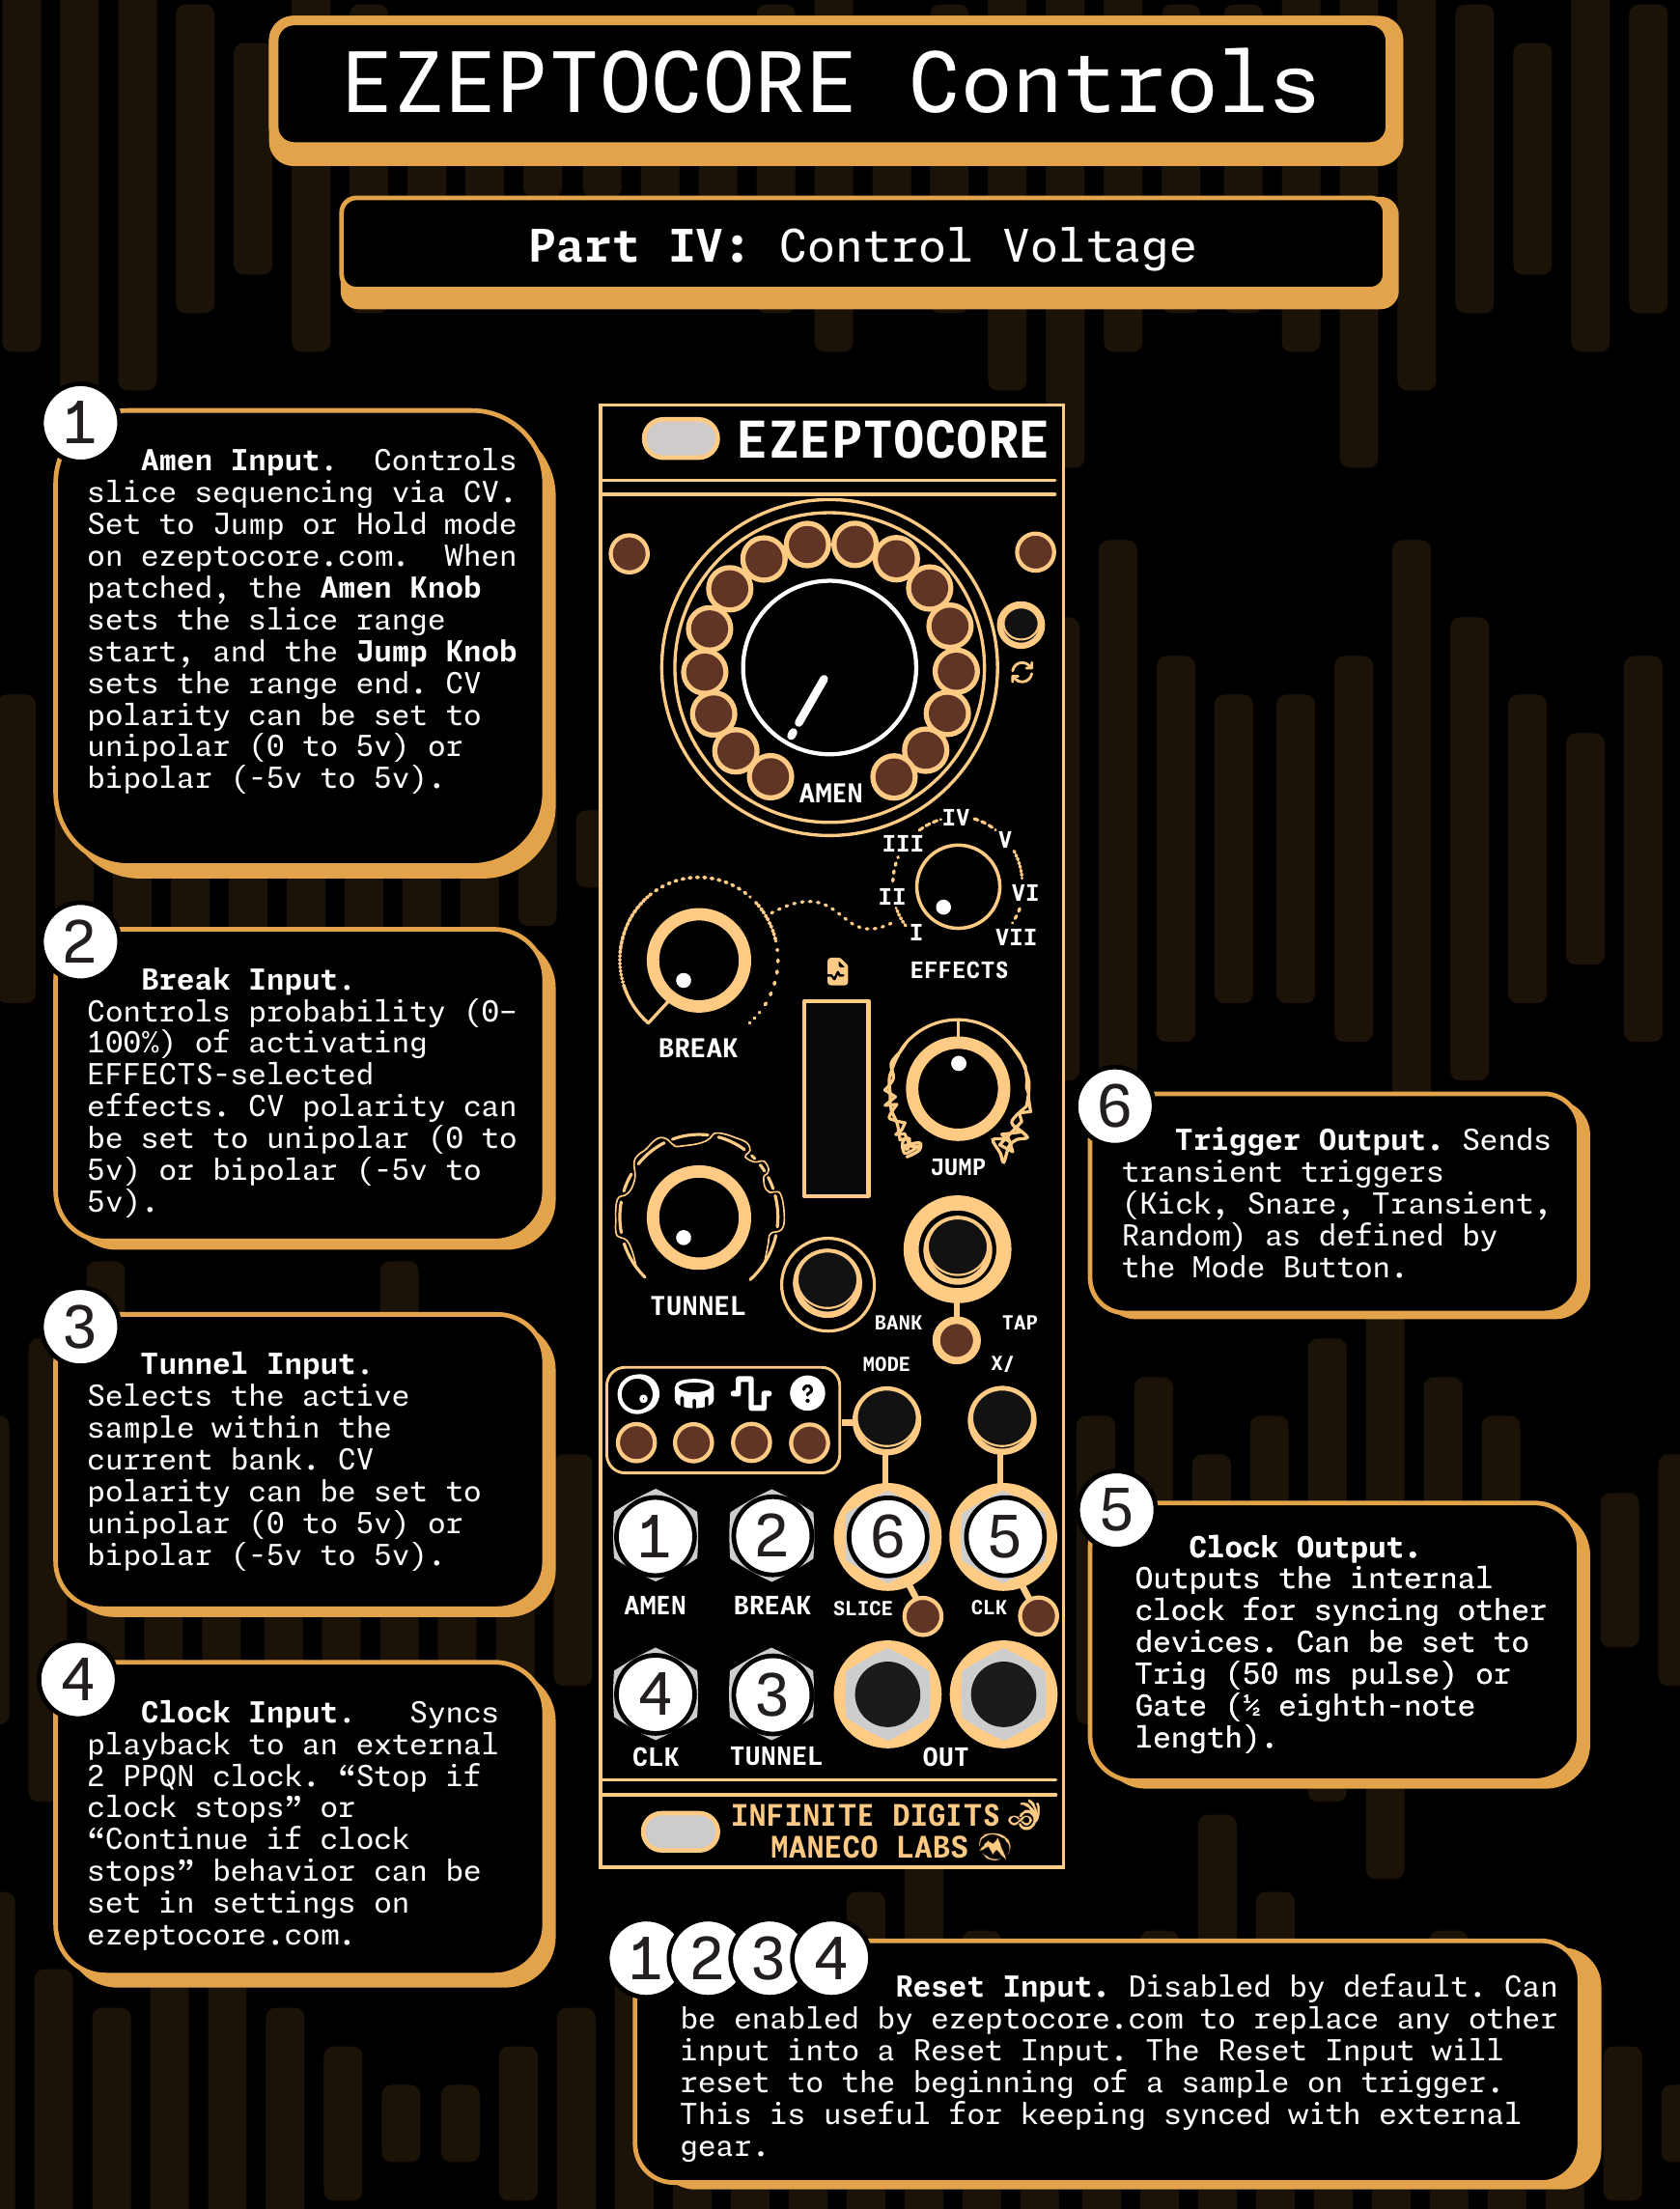
- AMEN input
- Selects slices by voltage. When patched, AMEN sets the start of the slice range and JUMP sets its end. Choose jump, repeat, or bipolar split behavior in settings.
- BREAK input
- Controls the probability of activating the combination chosen with EFFECTS.
- TUNNEL input
- Selects a sample within the current bank. The sample tool calls this Sample CV. Choose Bank divisions or 1 V/oct in settings to match your CV source.
- CLK input
- Synchronizes playback to an external clock at two pulses per quarter note (2 PPQN). Incoming clock settings determine whether playback stops when that clock stops.
- CLK output
- Sends a clock to other devices. Settings choose trigger or gate output and whether it follows the tempo or the slices.
- Reset override
- Disabled by default. Assign AMEN, BREAK, TUNNEL, or incoming CLK to reset playback to the beginning of the sample. The selected jack loses its usual function while the override is enabled.
The AMEN, BREAK, and TUNNEL inputs can each map either 0 to +5 V (unipolar) or −5 to +5 V (bipolar) across their control range. Choose the polarity that matches your modulation source.
Trigger outputs
The SLICE jack is the Trigger Out. Press MODE to select Kick, Snare, Transient, or Random. The first three follow markers in the sample; Random produces random triggers.
Use drum separation in the sample tool to find kick and snare events, or place markers by hand in the waveform editor. The trigger mode selects which markers produce pulses as playback crosses them.
Patch this output to another module’s trigger input, or send it back into BREAK for effects tied to particular hits. The pre-programmed breaks patch shows that connection.
Sample preparation tool
The desktop _core sample manager v8.1.0 edits a project folder or SD card directly. To start with the factory sounds, choose Project → Default samples → Ezeptocore. It downloads 96 samples across six banks into a new editable project in Downloads. Follow the default-sample steps to copy that project to a card.
Update the module to v8.1.0 before using newly prepared samples. Current tools save primary audio without stretched companion files; the firmware supplies live granular Time Stretch.
Prepare your library with the browser-based EZEPTOCORE sample tool. It organizes sixteen banks of up to sixteen samples each and streams audio from the card, so samples do not have to fit into the module’s RAM.
Choose a workspace and import sounds
No account or password is required. Enter a workspace name you can remember, or choose a generated URL. Anyone who knows that URL can access its data. For private work, use a hard-to-guess name or the offline sample tool.
Choose a bank and drag in audio files. WAV, AIF, OGG, and Renoise XRNI are supported. Embedded slice information in XRNI and compatible AIF files can be imported with the audio.
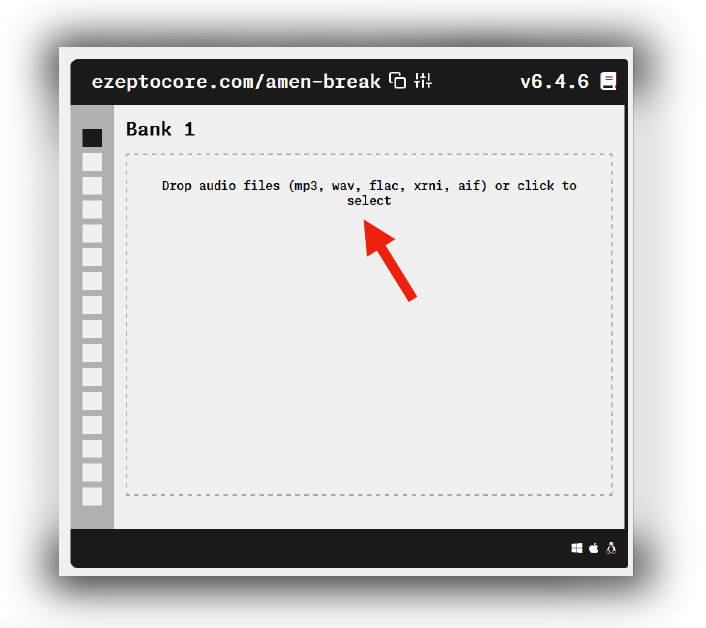
Edit slices, tempo, and trigger markers
Open a sample to edit its waveform. Set the source BPM accurately before enabling tempo matching; this tells the module how the original loop relates to the playback tempo. You can also convert a stereo file to mono.
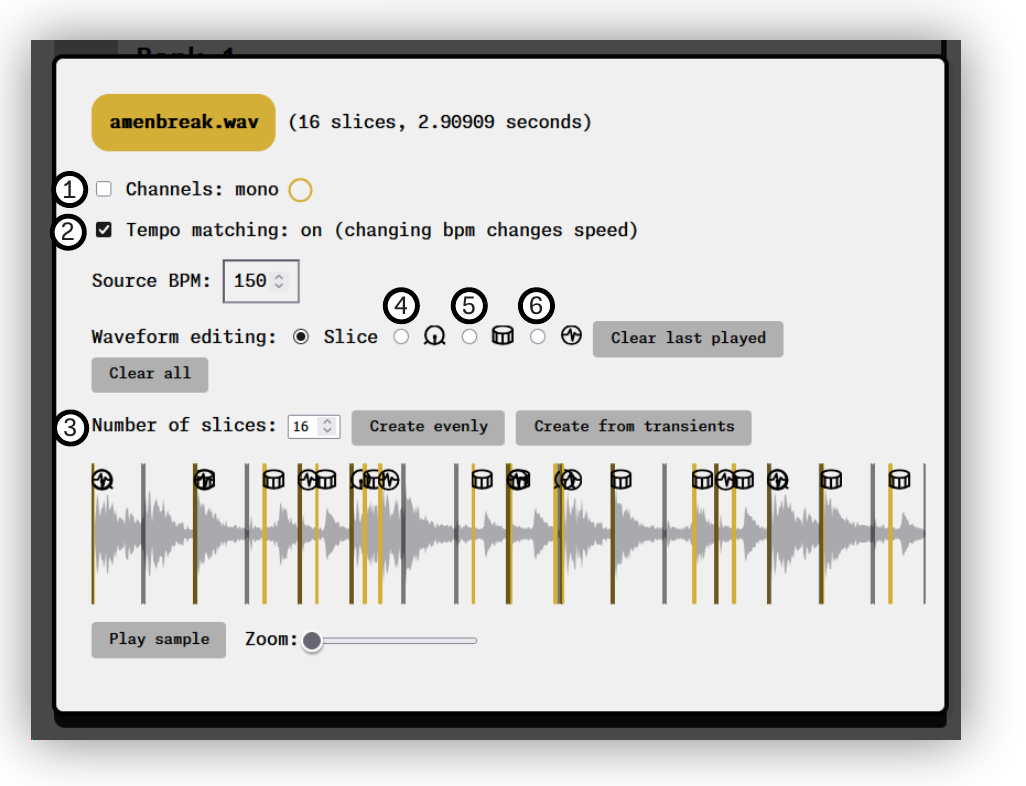
- Even slices divide the sample into equal parts. These are useful for evenly timed loops.
- Transient slices follow detected attacks. Move or add slice points by hand when a hit needs a more precise start.
- Kick, snare, and transient markers tell the Trigger Out where events occur. Choose a marker type, then place it on the waveform; use MODE on the module to choose which events it follows.
Copy the banks to the SD card
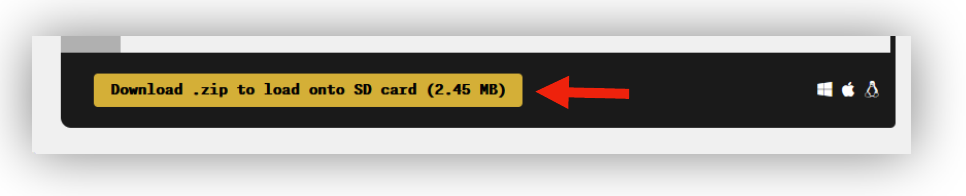
- Choose Download .zip when the bank layout and samples are ready.
- Extract the archive. Back up any banks you want to keep, then replace the bank folders on the SD card with the exported folders. Copy the folders themselves, not the ZIP or an enclosing download folder.
- Eject the card from the computer. With the module powered off, insert the card, then power on to load the banks.
Set up clocks, CV, and effects
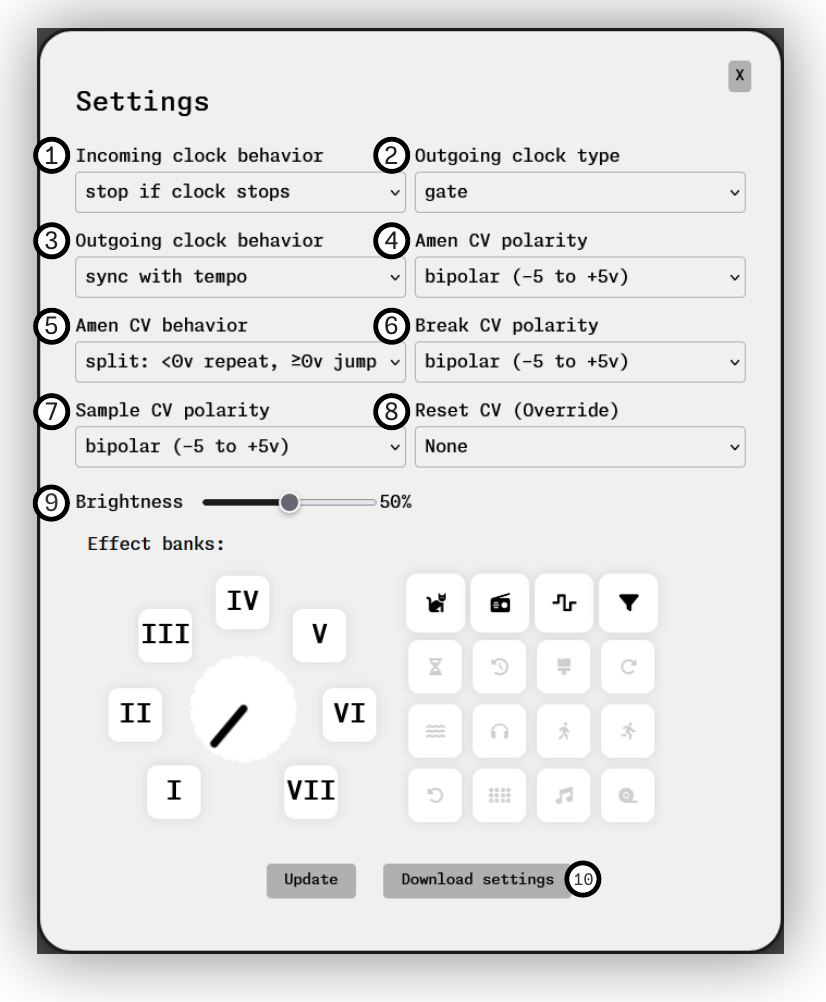
Open Settings in the desktop or browser sample tool to choose how the module responds to your patch. The desktop app saves changes directly to the open project or card. Browser exports must include the changed settings folder.
- Startup playback (v8.1.0)
- Play immediately (default) starts playing at power-on, as before. For a clocked system, choose Wait for clock or button: the module starts stopped, with audio silent and clock and trigger outputs idle, until the first clock pulse or a press of TAP. Save to the SD card and restart to apply.
- Start tempo
- Default (no override) preserves the usual startup tempo. Choose Fixed BPM and enter a whole number from 30 to 300 for a specific starting tempo. Restart with the updated card to apply it. Tap tempo and external clock sync remain available afterward.
- Incoming clock
- Choose “stop if clock stops” to make playback follow the external clock’s start and stop. Choose “continue” to let playback carry on when the clock stops.
- Sample CV mapping
- Bank divisions spreads sample selection across the input voltage range. 1 V/oct selects samples from note-based CV sources. This changes sample selection, not the pitch of the playing sample.
- Outgoing clock
- Choose a short trigger or a gate, then select “sync with tempo” or “sync with slice.” Slice sync follows the slice boundaries, which may be uneven when using transient or manual slicing.
- AMEN CV behavior
- “Jump on change” changes slices as the voltage changes. “Repeat at CV” keeps selecting the slice addressed by the voltage. Bipolar “split” uses negative voltages for repeat and zero or positive voltages for jump.
- CV polarity and reset
- Set AMEN, BREAK, and Sample CV to match unipolar or bipolar sources. A Reset CV override replaces the chosen input’s normal behavior; it does not add a separate input.
- Brightness
- Adjust the multicolor LEDs to suit the room. Higher brightness also increases power consumption.
Choose the seven effect combinations
Select a mapping from I–VII and toggle the effects it should contain. The EFFECTS knob chooses among these seven mappings; BREAK sets their probability. Try a mapping with just one effect first so you can hear what it contributes.
The sixteen choices are fuzz, lossy compression, bit reduction, filtering, time stretch, tape delay, comb filtering, beat repeat, reverb, auto-pan, pitch down, pitch up, reverse, retrigger, retrigger with pitch shift, and tape stop.
Save settings to the card
In the desktop app, wait for Ready before ejecting the card. If you edited a local project instead, copy its contents to the SD-card root. In the browser tool, choose Download settings and extract the download if it is an archive. Back up the card’s existing settings folder, delete that old folder, and copy the new settings folder to the card. Do not merge the two folders. Eject the card and restart the module with it inserted.
Four patches to try
These four patches start with a simple connection or knob position. Change one thing at a time so you can hear which part of the patch is doing the work.
Basic playback
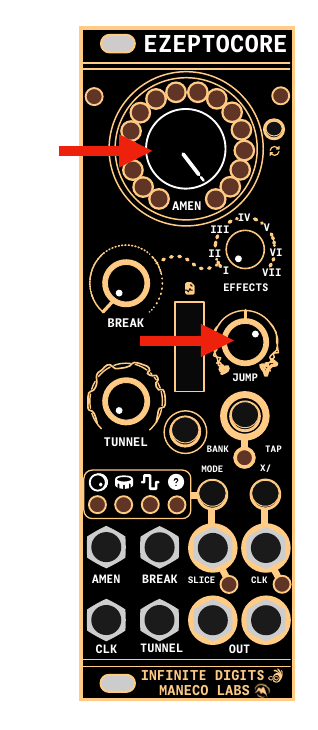
Leave AMEN and BREAK fully counterclockwise and JUMP at noon. Choose a sample with TUNNEL. This gives you a reference sound before you add sequencing or effects.
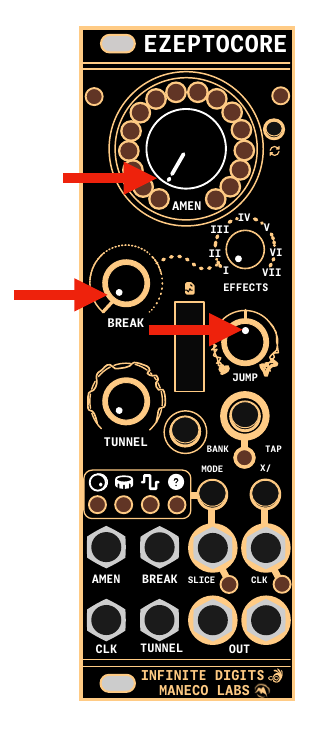
Auto-rungler
Turn AMEN fully clockwise for an evolving random slice sequence. Move JUMP a little clockwise to add occasional detours that return to the underlying sequence. Start with BREAK low so you can hear the slicing.
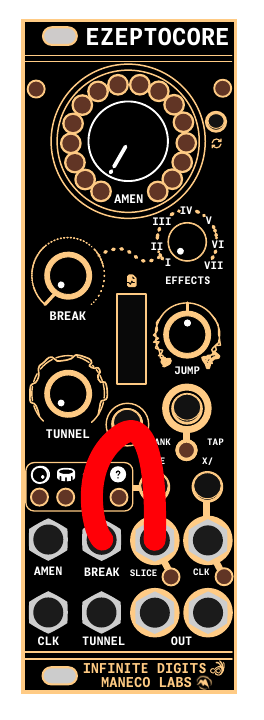
Pre-programmed breaks
Connect SLICE / Trigger Out to the BREAK input. Choose Kick, Snare, or Transient with MODE, then choose an effect mapping. Marker pulses now drive the effect probability. Edit the markers in the sample tool to decide which hits trigger those changes.
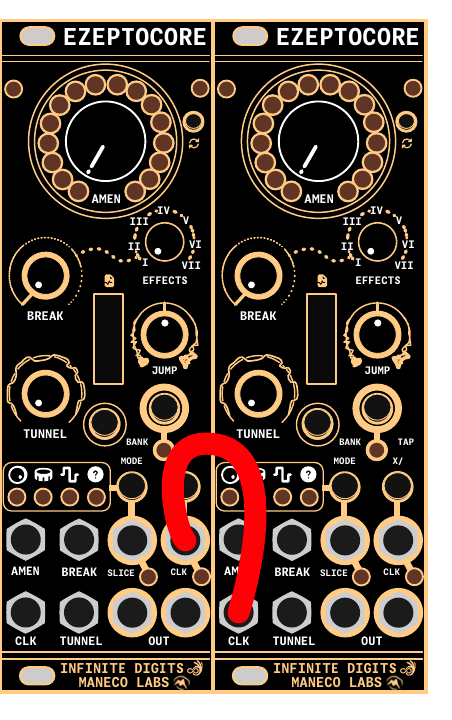
Sync two modules
Connect CLK Out on the first module to CLK In on the second. Set the second module’s incoming clock behavior to “stop if clock stops.” Use a tempo-synced clock output on the first module to share a regular beat.
Firmware
Use the store’s EZEPTOCORE firmware selector to choose a v8.1.0 clock and latency build. Overclocking firmware provides the most effect-processing headroom when externally clocked; non-overclocking firmware prioritizes the most stable internal timing.
Normal latency is the best balance for most setups. Low-latency builds respond faster at the cost of some effect-processing headroom. The v8.1.0 release has no ultra-low-latency build. Full release notes and desktop sample-tool downloads are on the v8.1.0 release page.
Copy firmware over USB
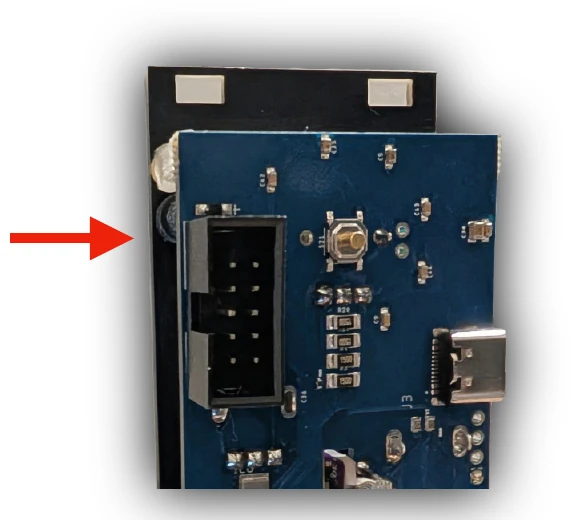
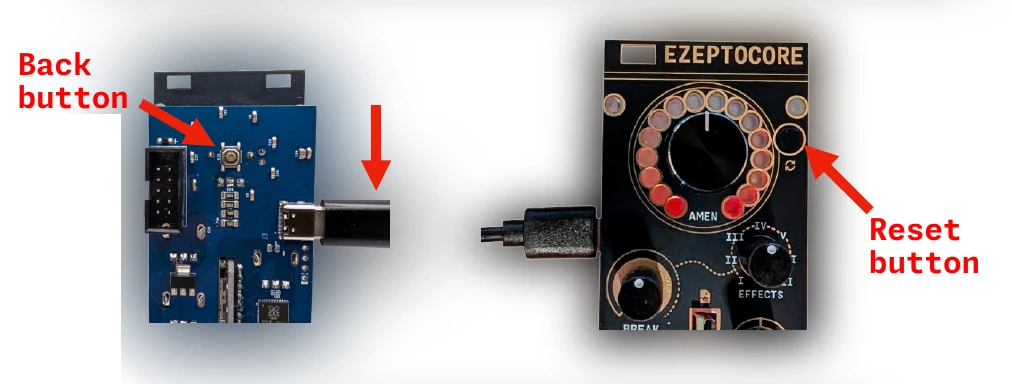
- Download the EZEPTOCORE
.uf2file from the selector above. If you need to remove the module to reach its rear button, switch off and unplug the case first. - Connect the module to your computer with a USB data cable. Hold the small button on the back, press the front-panel RESET button, then release the rear button.
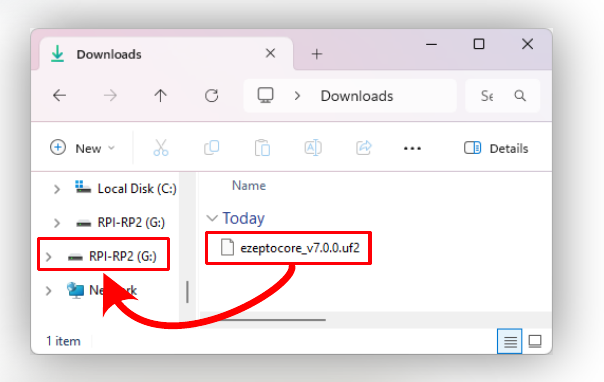
- A drive named
RPI-RP2appears on the computer. Copy the downloaded.uf2file onto it. - The drive disconnects when the module accepts the firmware and restarts. You can then return to normal use.
Calibrate the knob centers
EZEPTOCORE arrives calibrated. Recalibrate if the LED positions no longer line up with the knob centers.
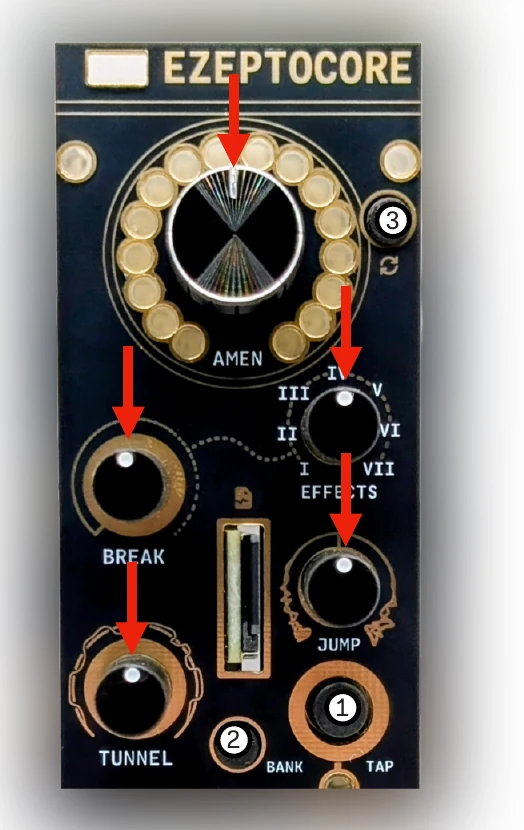
- Power on the module and set all five knobs to 12 o’clock, including EFFECTS.
- Hold TAP, then hold BANK as well.
- Keep both held and press the front-panel RESET button.
- When the lights flash, release TAP and BANK. Let the module finish calibrating and restart.
Frequently asked questions
How is EZEPTOCORE different from Ectocore?
Both are Eurorack implementations of Infinite Digits’ Zeptocore platform. They use Infinite Digits firmware, share compatible workflows and sample tools, and draw on the open-source Zeptocore hardware design and Émilie Gillet’s Plaits schematics.
EZEPTOCORE is a ground-up redesign developed with Maneco Labs. Its changes include:
- Improved thermal management for overclocking.
- A dedicated front-panel reset button.
- Easier and more reliable firmware updates.
- More consistent panel labeling.
- Improved website tooling and offline support.
- Firmware stability fixes and new performance effects.
What is new in the EZEPTOCORE firmware?
Firmware v8.1.0 adds Startup playback → Wait for clock or button for starting on demand. The matching desktop sample manager can download the default EZEPTOCORE and Ectocore banks as editable projects. Current firmware uses live granular Time Stretch, so new sample exports no longer need stretched companion files.
The BLUE (TAP) and RED (MODE) controls provide expanded performance effects:
- Pitch shift independent of BPM.
- Beat repeat with pitch, decay, and quantization.
- 8-bit decimation, digital jitter, digital smear, and digital wavefolding.
- Chaos Trembler random tremolo.
The firmware also improves stability, reliability, timing accuracy, and latency.
Which SD card should I use?
Use a high-quality card. Gigastone, SP Elite, SanDisk Extreme, Samsung EVO, PNY Elite, and MicroCenter cards have been tested. Labels such as “A1,” “U3,” or “high-speed” do not by themselves guarantee consistent performance.
Which firmware should I use?
Choose overclocking firmware for maximum FX performance with an external clock. Choose non-overclocking firmware for the most stable internal timing. Start with normal latency, moving to low latency only when faster response is worth reduced FX headroom.
Has the variable-slice external-clock bug been fixed?
Yes. Since firmware v6.4.4, slice advancement uses per-slice pulse accumulation, preventing double triggering and keeping variable-slice mode locked to external clocks as reliably as fixed slices.
Has the latency issue been fixed?
Firmware v6.3.7 addressed start and trigger delays. Response depends on the firmware build and sample preparation. If timing feels wrong, verify that loops have accurate BPM values and that slice points are not placed before their transients.
Can I install EZEPTOCORE firmware on Ectocore?
It is technically compatible, but not recommended. The modules have different hardware and thermal profiles, and EZEPTOCORE firmware is tuned for its redesigned thermal behavior. Use the dedicated Ectocore firmware instead.
Does the sample tool work with Ectocore?
Yes. ezeptocore.com supports both EZEPTOCORE and Ectocore and is based on the original Zeptocore sample manager.
DIY, source, and schematic
The firmware and related source are GPL-3.0 licensed, and the project publishes its schematic alongside
the source. Browse the canonical _core repository
or open the EZEPTOCORE schematic directly.
Acknowledgments
Infinite Digits created the Zeptocore platform and EZEPTOCORE’s firmware, sample tools, and software. Maneco Labs designed and manufactured the EZEPTOCORE hardware. The instrument draws on the work of the Raspberry Pi, Adafruit, and Émilie Gillet communities, alongside earlier Infinite Digits instruments and music scripts.
The sample tools use Alexandre Défossez’s Demucs work for drum separation, with Aubio and SoX contributing to audio processing and slice detection. Thanks also to the open-source maintainers and musicians whose work and experiments keep these instruments moving.
Read the full project history and acknowledgments, or the credits in the original manual.